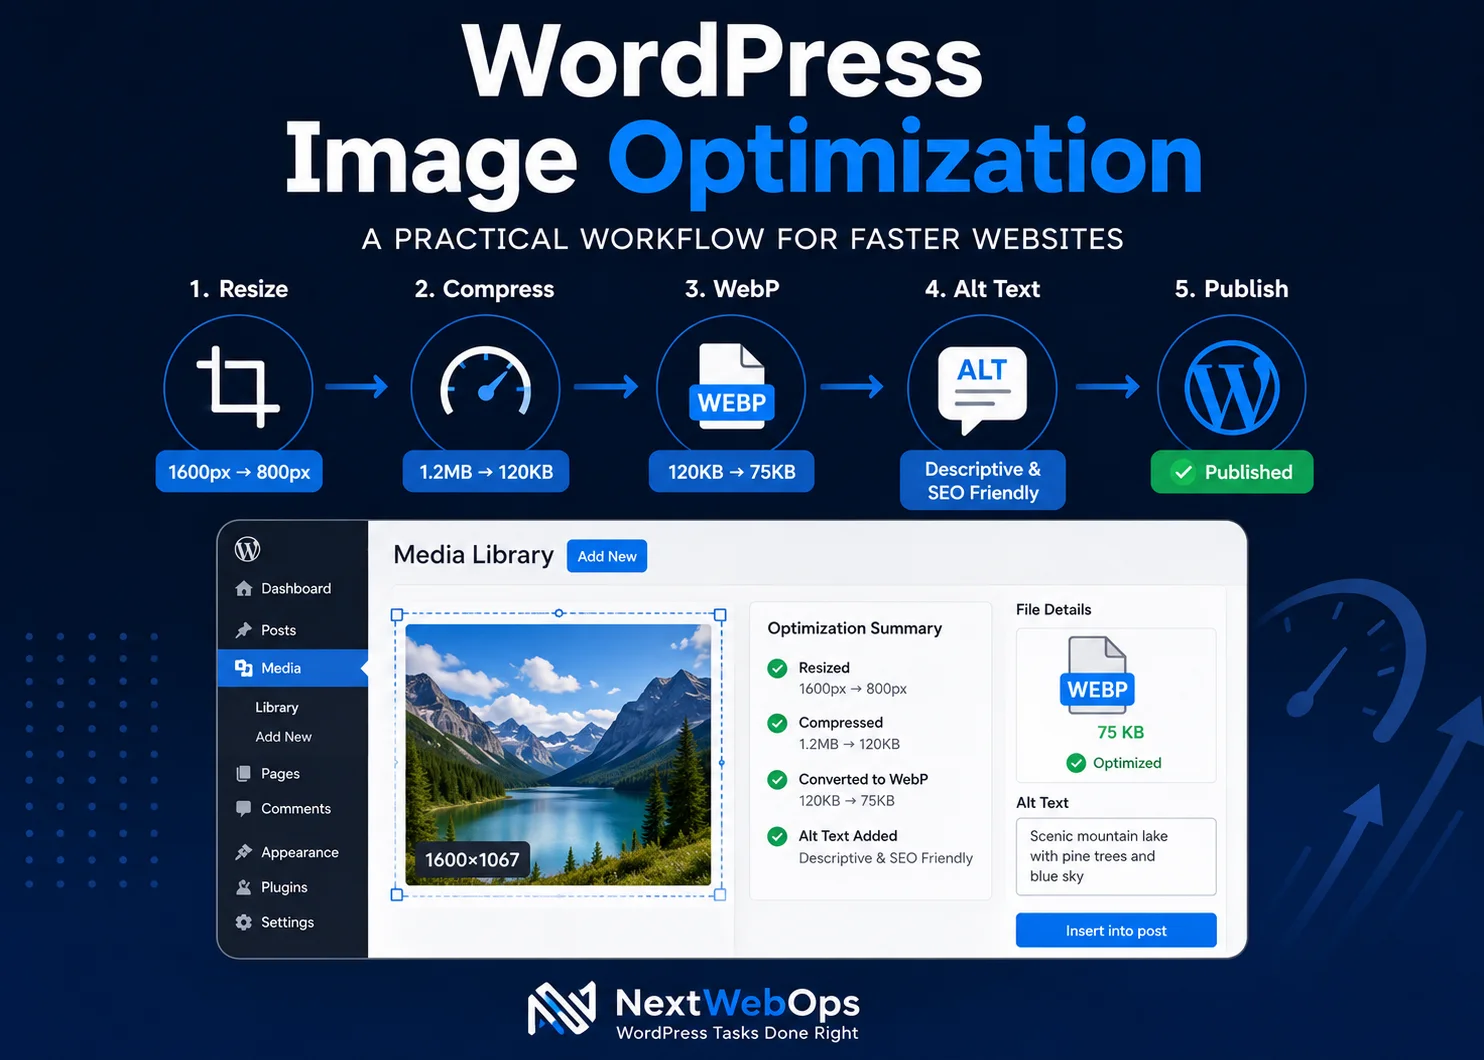
WordPress image optimization is the process of reducing unnecessary image weight while keeping images clear, useful, and properly formatted for your website. It includes choosing appropriate dimensions, compressing files, selecting the right format, using descriptive filenames, adding useful alt text, and checking how images load and display after publication.
Images are often some of the largest files on a web page. Uploading oversized photos directly from a camera, design tool, or stock library can add unnecessary weight to a WordPress site. At the same time, compressing images too aggressively can leave them blurry and unprofessional.
The goal is not to make every image as small as possible. The goal is to find a practical balance between visual quality, file size, website performance, accessibility, and SEO.
This guide explains how businesses, marketers, and content teams can build a repeatable WordPress image optimization workflow for both new and existing content.
What Is WordPress Image Optimization?
WordPress image optimization involves preparing and delivering images in a way that avoids unnecessary file size while maintaining acceptable visual quality.
A complete optimization process can include:
- Choosing appropriate image dimensions
- Selecting the right file format
- Compressing image files
- Using WebP or AVIF when appropriate
- Renaming image files before upload
- Writing descriptive alt text
- Using suitable WordPress image sizes
- Taking advantage of responsive images
- Using lazy loading appropriately
- Reviewing images during publishing QA
This is why image optimization should not be treated as simply installing a plugin and assuming the job is finished.
Plugins can automate useful tasks, but they cannot always determine whether an image was uploaded at unnecessarily large dimensions, whether its filename is meaningful, whether the alt text accurately describes it, or whether the image is actually useful to the page.
Why WordPress Image Optimization Matters
Faster Page Loading
Large image files increase the amount of data a browser must download before a page is fully displayed.
For example, if a blog post includes several images that are each more than a megabyte, those images can quickly become a major portion of the page’s total weight.
Reducing unnecessary image size can make pages lighter and improve the experience for visitors, particularly those using mobile devices or slower connections.
Better User Experience
Visitors expect website content to appear quickly and display properly across different screen sizes.
An image that takes too long to load can interrupt reading. An image uploaded at the wrong dimensions may also appear stretched, cropped awkwardly, or unnecessarily large.
Image optimization therefore includes both performance and presentation.
Better SEO Implementation
Image optimization supports SEO in several ways. Descriptive filenames and useful alt text provide context, while efficient image delivery contributes to a better-performing page.
However, simply compressing an image does not automatically produce higher search rankings. Image optimization works best as part of a broader on-page optimization process that includes useful content, logical headings, metadata, internal linking, and a good user experience.
For the broader search optimization side of the topic, see the NextWebOps guide to image SEO best practices.
Lower Storage and Bandwidth Requirements
Smaller files can also reduce unnecessary storage and bandwidth use.
This may not matter much on a small website with only a few images, but the difference becomes more noticeable when a WordPress Media Library contains hundreds or thousands of uploads.
10 WordPress Image Optimization Best Practices
1. Resize Images Before Uploading
One of the most useful WordPress image optimization habits is also one of the simplest: do not upload images much larger than you actually need.
Imagine that your blog content displays an image at approximately 900 pixels wide. Uploading a 5000-pixel-wide photo usually provides little practical benefit for that placement, yet the source file may be significantly larger.
Before uploading, determine roughly how large the image needs to appear on the site and export it at suitable dimensions.
Remember that image dimensions and image file size are different:
- Dimensions describe width and height in pixels.
- File size describes how much storage the file requires, such as KB or MB.
A properly optimized workflow pays attention to both.
2. Choose the Right Image Format
Different image formats are useful for different situations.
Common options include:
- JPEG: commonly suitable for photographs and images with many colors.
- PNG: useful when transparency is required or for certain graphics, but files can be larger than necessary for photographs.
- WebP: a modern format that can provide good image quality at relatively efficient file sizes.
- AVIF: another modern format capable of strong compression, depending on your workflow and site setup.
- SVG: useful for certain vector graphics such as icons and logos when handled securely and appropriately.
There is no requirement to convert every image to the same format. The goal is to choose the format that suits the image and publishing environment.
3. Compress Images Without Destroying Quality
Compression reduces the amount of data stored in an image file.
Two concepts you may encounter are:
- Lossless compression: aims to reduce file size without discarding image information.
- Lossy compression: can achieve greater file-size reductions by removing some information from the image.
For website publishing, some level of lossy compression can often produce a useful balance between appearance and file size. The exact settings depend on the image.
Do not optimize based only on the smallest possible number. A 40 KB image is not an improvement if text inside the graphic is unreadable or the photo looks visibly degraded.
After compression, inspect the image at the size visitors will actually see it.
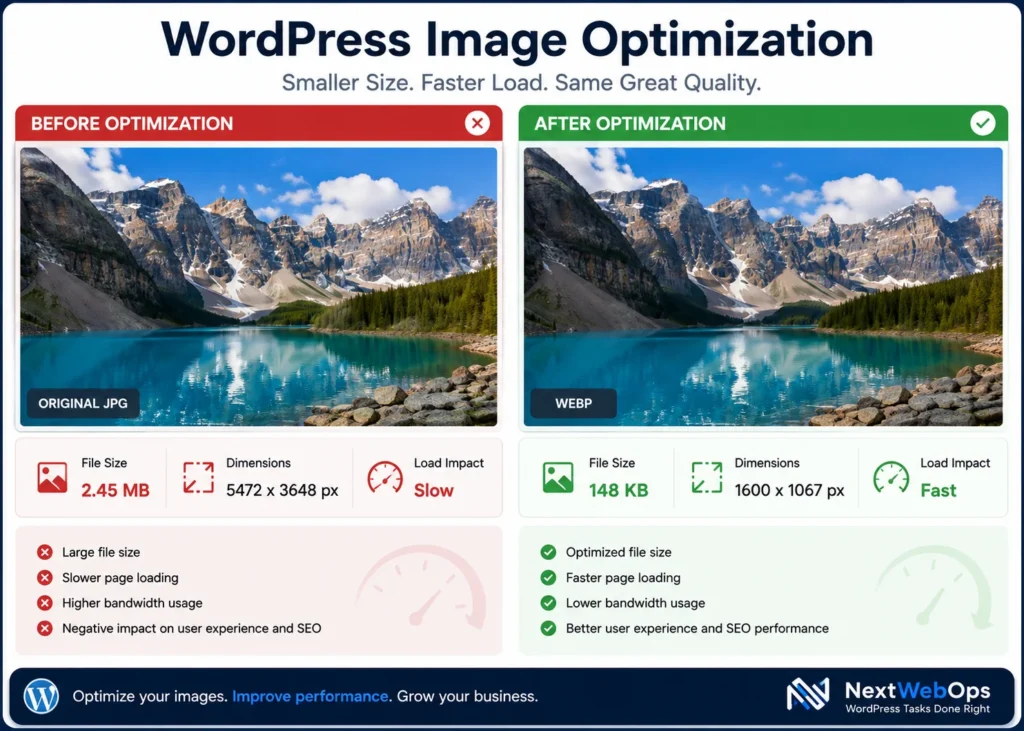
4. Use WebP or AVIF When Appropriate
Modern formats such as WebP and AVIF can reduce image file sizes while maintaining useful visual quality.
For many WordPress publishing workflows, WebP is a practical option because it works well for common website images and is supported by many optimization tools.
AVIF can also produce efficient files, but whether it belongs in your workflow depends on your WordPress setup, optimization tools, browser delivery method, and publishing process.
The important point is to avoid using a format simply because it is newer. Compare file size, visual quality, compatibility, and how the site actually serves the image.
5. Rename Image Files Before Uploading
A camera or design application may generate filenames such as:
IMG_8472.jpg
That filename gives little indication of what the image contains.
A descriptive filename such as:
wordpress-image-optimization-workflow.webp
is easier to recognize in the WordPress Media Library and gives the file clearer context.
Keep filenames:
- Descriptive
- Concise
- Lowercase
- Separated with hyphens
- Relevant to the actual image
Avoid forcing keywords into unrelated filenames just for SEO.
6. Write Useful Alt Text
Alternative text, or alt text, helps communicate the purpose or content of an image when the image cannot be seen and is particularly important for accessibility.
Good alt text should usually describe what is relevant about the image within the context of the page.
Avoid alt text such as:
wordpress image optimization wordpress image optimization SEO best WordPress images
That does not help the reader and is simply keyword stuffing.
A more useful example for a workflow graphic might be:
WordPress image optimization workflow showing resizing, compression, WebP conversion, and publishing
Not every decorative image requires descriptive alt text. Alt text decisions should be based on the purpose of the image rather than a desire to insert more keywords.
7. Use Responsive Images Correctly
Modern WordPress sites can generate multiple image sizes and provide browsers with options so an appropriate image can be selected for the visitor’s screen.
This is useful, but it does not mean source-image preparation should be ignored.
If a publisher uploads an unnecessarily huge original file every time, WordPress still has to store and process that asset. A cleaner workflow starts with an appropriately prepared source image and then lets WordPress handle the responsive variations required by the theme or layout.
8. Use Lazy Loading Where Appropriate
Lazy loading delays the loading of certain images until they are needed, such as when a visitor scrolls farther down a page.
This can reduce the amount of content that needs to load immediately.
However, lazy loading should not automatically be applied to every image without considering its location.
A prominent image near the top of the page may need to load immediately. Delaying an important above-the-fold image can work against the performance improvement you are trying to achieve.
Use lazy loading as part of a broader performance strategy rather than as a universal rule.
9. Optimize Existing WordPress Images
Image optimization is not limited to new uploads.
Older WordPress websites may already contain years of unoptimized media. Common problems include:
- Very large original photographs
- PNG files that could have used a more efficient format
- Missing alt text
- Generic filenames
- Duplicate uploads
- Old featured images that are much larger than necessary
Start by identifying the highest-impact images rather than trying to replace every Media Library item immediately.
Priority pages may include:
- Homepage
- Important service pages
- High-traffic blog posts
- Landing pages
- Pages with many large images
Image optimization plugins can also provide bulk-compression or next-generation format conversion features for existing files.
Before running large-scale changes, make sure you understand how the plugin handles originals, backups, replacement files, and image URLs. After bulk optimization, review important pages to confirm that images still display correctly.
10. Check Images During Publishing QA
The final image optimization step should happen before publication.
Check:
- Is the correct image being used?
- Are the dimensions appropriate?
- Does the image still look sharp enough?
- Is the file format suitable?
- Is the filename descriptive?
- Does the image need alt text?
- Does it display properly on mobile?
- Does the featured image use the correct dimensions?
- Are linked images pointing to the correct destination?
- Does the page remain visually stable while images load?
A repeatable WordPress publishing checklist can help make these checks part of the normal publishing process instead of an occasional cleanup task.
WordPress Image Optimization Plugins: Do You Need One?
A WordPress image optimization plugin can automate many useful tasks.
Depending on the plugin, features may include:
- Automatic image compression
- Bulk optimization
- Automatic resizing
- WebP conversion
- AVIF conversion
- Lazy loading
- Image CDN delivery
- Optimization of existing Media Library files
Common image optimization tools include Imagify, ShortPixel, Smush, EWWW Image Optimizer, and Optimole.
There is no universally best plugin for every WordPress website. The right choice depends on factors such as:
- Number of images
- Monthly upload volume
- Whether you need bulk optimization
- WebP or AVIF requirements
- Storage and CDN preferences
- Budget
- Existing caching or performance tools
- How much control you want over image quality
Do not install multiple plugins that perform overlapping image-processing tasks without understanding how they interact.
Manual Image Optimization vs. WordPress Plugins
Manual optimization and plugin automation are not necessarily competing approaches.
When Manual Optimization Works Well
Preparing images before upload is useful when:
- You control the publishing workflow.
- You know the required image dimensions.
- Publishing volume is manageable.
- You want control over image quality.
- You want clean filenames before files enter the Media Library.
Manual preparation can prevent unnecessarily large source images from entering WordPress in the first place.
When Plugin Automation Helps
Plugins become particularly useful when:
- Multiple contributors upload images.
- You publish large amounts of content.
- Your Media Library already contains unoptimized files.
- You want automatic WebP or AVIF generation.
- You need bulk compression.
- You want an additional optimization layer after upload.
The Practical Combination
For many websites, the strongest workflow is:
Prepare images correctly before upload, then use WordPress automation as a safety net.
For example, a publisher can resize an image, select an appropriate format, give it a descriptive filename, and compress it before upload. The site’s image optimization system can then perform additional compression or create alternate formats if needed.
This approach avoids asking a plugin to compensate for every publishing mistake.
A Simple WordPress Image Optimization Workflow
A documented process helps businesses and agencies optimize images consistently, even when several people publish content.
- Choose the image. Confirm that it adds value to the page.
- Crop and resize it. Prepare dimensions appropriate for the intended placement.
- Choose the format. Select JPEG, PNG, WebP, AVIF, or another appropriate format.
- Compress the image. Reduce unnecessary file size while preserving acceptable visual quality.
- Rename the file. Use a descriptive filename before uploading it.
- Upload it to WordPress. Add the prepared image to the Media Library.
- Add appropriate alt text. Describe the image when needed for accessibility and context.
- Insert the correct image size. Avoid displaying unnecessarily large versions.
- Preview the page. Review both desktop and mobile presentation.
- Complete publishing QA. Check visual quality, placement, links, metadata, and loading behavior.
Making image optimization part of a broader on-page SEO checklist also helps prevent images from being treated as a separate task after the rest of the page has already been published.
Common WordPress Image Optimization Mistakes
Uploading Full-Resolution Images Directly
A 4000- or 5000-pixel-wide image may be useful for print or detailed editing, but it is often unnecessary for a standard blog article.
Using PNG for Every Image
PNG is useful in specific situations, but using it automatically for large photographs can result in unnecessarily large files.
Compressing Images Too Aggressively
Optimization should not make your website look worse. Always check visual quality after compression.
Ignoring Modern Formats
WebP and AVIF can be useful options when they fit your site’s workflow and delivery setup.
Keyword-Stuffing Alt Text
Alt text should describe the image and its purpose. It is not a field for repeating every target keyword.
Leaving Generic Filenames
Files such as IMG_1837.jpg are harder to identify later and provide little descriptive context.
Assuming a Plugin Fixes Everything
An image compression plugin cannot decide whether the image is useful, whether its filename makes sense, whether its alt text is appropriate, or whether it is displayed correctly within the article.
Skipping Mobile QA
An image that looks good on a desktop screen may be awkwardly cropped, oversized, or difficult to read on a phone.
How WordPress Image Optimization Fits Into SEO
WordPress image optimization is one part of a larger website optimization process.
From a publishing perspective, the main priorities are to make images:
- Appropriately sized
- Efficiently compressed
- Delivered in a suitable format
- Descriptively named
- Accessible when alt text is needed
- Relevant to the surrounding content
- Properly displayed across devices
Image optimization should then work alongside other on-page elements such as headings, metadata, internal links, useful content, and page structure.
If you are reviewing the broader optimization of a page rather than images alone, an on-page SEO audit can help identify issues across the complete page.
How NextWebOps Supports WordPress Image Optimization
For teams publishing content regularly, image preparation can become another repetitive step between receiving finished content and getting a polished page live.
NextWebOps supports WordPress publishing workflows with tasks such as:
- Image resizing
- Image compression
- Format preparation
- Descriptive filenames
- Alt text implementation
- Featured image preparation
- WordPress media uploads
- Content formatting
- Internal linking
- On-page SEO implementation
- Publishing QA
This allows writers, marketers, and agencies to focus more on creating and approving content while the implementation work is handled consistently.
If you have WordPress content ready to publish and need help preparing images, formatting pages, implementing SEO elements, or completing publishing QA, contact NextWebOps to discuss your publishing workflow.
Frequently Asked Questions About WordPress Image Optimization
How do I optimize images in WordPress?
Start by resizing images to appropriate dimensions, selecting a suitable file format, compressing the files, using descriptive filenames, adding useful alt text where needed, and checking the final page. A WordPress optimization plugin can automate additional tasks such as compression, WebP or AVIF conversion, and bulk optimization.
What is the best image format for WordPress?
There is no single best format for every image. JPEG can work well for photographs, PNG is useful when transparency is required, and modern formats such as WebP and AVIF can provide efficient compression. Choose according to image type, visual quality, file size, and your website’s delivery setup.
Should I use WebP images in WordPress?
WebP is a practical option for many WordPress websites because it can reduce file size while preserving useful visual quality. Whether you convert files manually or through a plugin depends on your publishing workflow.
Should I compress images before uploading them to WordPress?
In many cases, yes. Preparing appropriately sized and compressed images before upload prevents unnecessarily large source files from entering the Media Library. An optimization plugin can then provide an additional automation layer if required.
Do I need a WordPress image optimization plugin?
Not necessarily. A low-volume site with a disciplined manual workflow may be able to prepare images before upload. Plugins become more useful when publishing volume is high, several people upload images, or an existing Media Library needs bulk optimization.
How do I optimize images already uploaded to WordPress?
Start by identifying oversized or high-impact images on important pages. Depending on your setup, you can replace large files manually or use an image optimization plugin with bulk-compression and next-generation format features. Review important pages after making large-scale changes.
Build Image Optimization Into Your Publishing Process
The most reliable approach to WordPress image optimization is to treat it as part of publishing rather than as an emergency performance fix.
Resize images before upload. Choose formats intentionally. Compress files without sacrificing useful quality. Use clear filenames and appropriate alt text. Take advantage of WordPress automation where it helps, but do not expect a plugin to replace good publishing decisions.
When these steps become part of a repeatable workflow, it becomes much easier to maintain a WordPress website with cleaner media, lighter pages, more consistent content, and fewer image-related publishing issues.
Leave a Reply