Author: Muhammad Ansar

  • WordPress Featured Image Size: Best Dimensions and Image Tips

    WordPress Featured Image Size: Best Dimensions and Image Tips

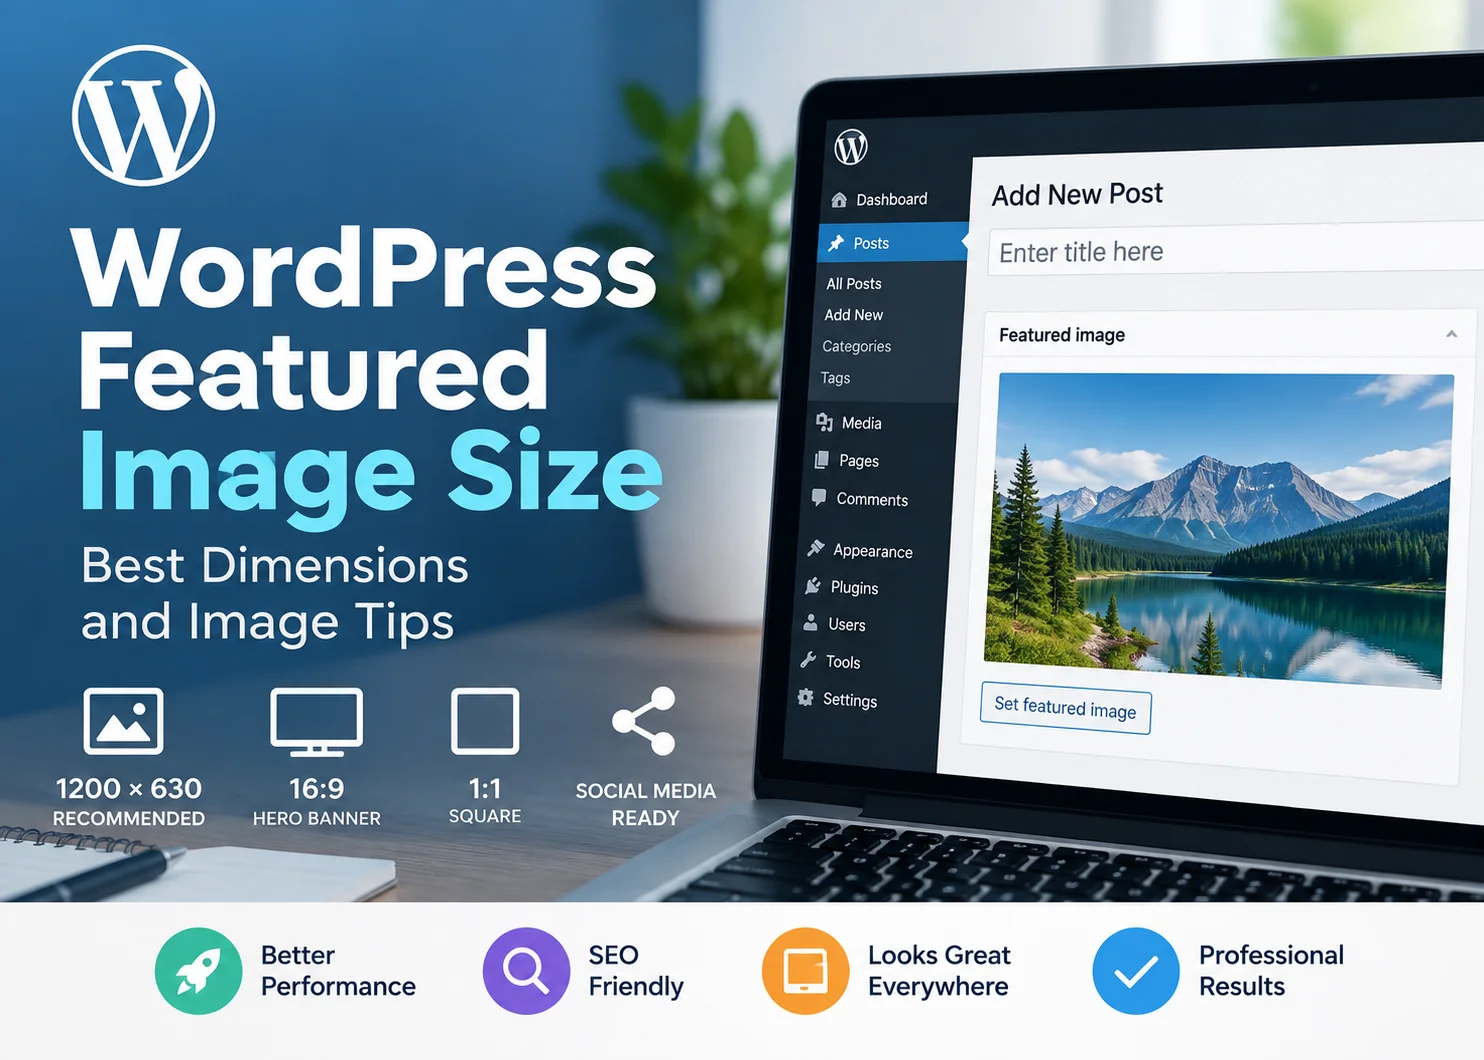
    The best WordPress featured image size depends on your theme, layout, aspect ratio, and where the image appears.

    A common general-purpose starting point is around 1200 × 630 pixels, but that should not be treated as a universal requirement.

    The more important question is whether the image matches your theme’s expected shape, is large enough for the display area, and is optimized before upload.

    A featured image can look perfect in one WordPress theme and crop badly in another, even when the exact same file is used.

    This guide explains practical featured image dimensions, aspect ratios, cropping, image formats, compression, SEO, and the checks you should make before and after publishing.

    What Is the Best WordPress Featured Image Size?

    For many blogs, 1200 × 630 pixels is a useful starting size.

    It provides a wide landscape ratio, is large enough for many article layouts, and also works well for social sharing in many cases.

    WordPress.com’s WordPress image size guidance lists 1200 × 630 as a useful size for many blog images and social sharing, while also noting that larger images may be appropriate for wider layouts.

    However, your theme should always come first.

    If your theme expects a 16:9 hero image, a 1200 × 630 source may still crop. If it uses square cards, the same file may be cropped even more aggressively.

    A better rule is:

    Match your theme’s preferred aspect ratio, then provide enough source resolution for the largest expected display size.

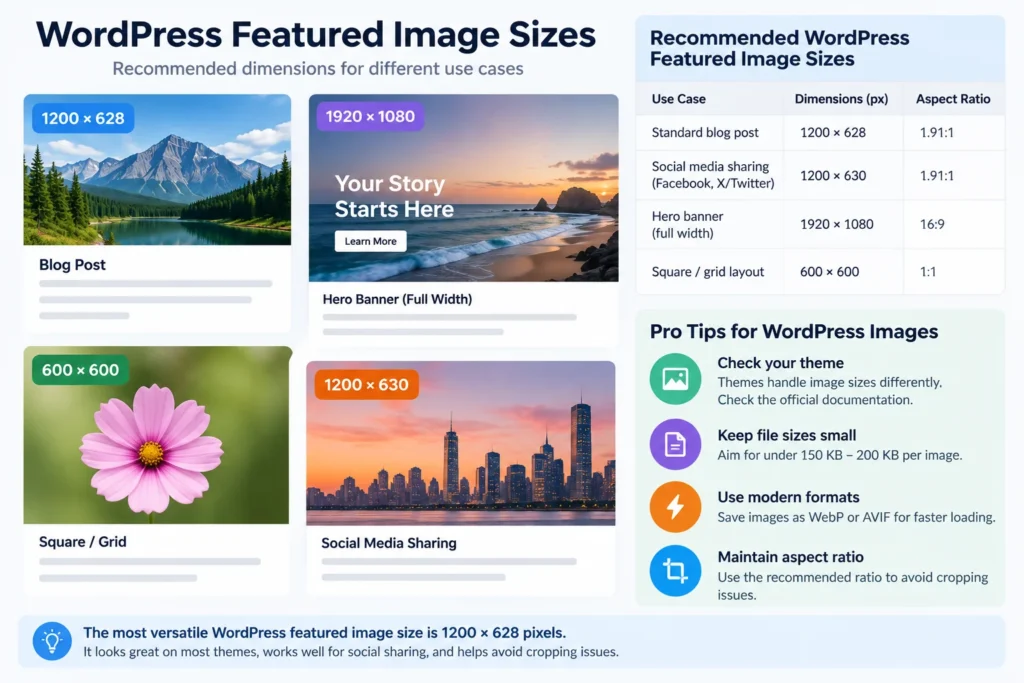
    WordPress Featured Image Sizes by Use Case

    Use Case Suggested Starting Size Aspect Ratio
    Standard blog featured image 1200 × 630 px About 1.91:1
    Wide hero or banner 1600 × 900 or 1920 × 1080 px 16:9
    Square blog grid 800 × 800 px 1:1
    Portrait card Theme-dependent Often 4:5 or similar
    Social-share-friendly image 1200 × 630 px About 1.91:1

    These are practical starting points, not WordPress rules.

    Your theme, builder, and site design may use different ratios.

    Why There Is No Universal WordPress Featured Image Size

    WordPress itself does not force every theme to display featured images in one fixed shape.

    The final appearance may be controlled by:

    • theme templates
    • blog archive cards
    • single-post headers
    • page builders
    • custom CSS
    • mobile breakpoints
    • image cropping settings

    That means two sites can upload the same 1200 × 630 image and get completely different results.

    One may display the full image.

    Another may crop the left and right edges.

    A third may crop the top and bottom to fit a fixed-height card.

    Image Dimensions vs Aspect Ratio

    WordPress featured image sizing guide comparing cropping, blurry images and optimized dimensions

    These two concepts are often confused.

    Image Dimensions

    Dimensions describe the exact pixel width and height.

    Example:

    1200 × 630 pixels

    Aspect Ratio

    Aspect ratio describes the relationship between width and height.

    For example, 1200 × 630 is approximately a 1.91:1 ratio.

    A 1600 × 900 image is 16:9.

    Why does this matter?

    Because cropping usually happens when the uploaded image and the display container use different aspect ratios.

    If your theme expects 16:9 but you upload a square image, something has to give.

    The image may:

    • crop
    • stretch
    • letterbox
    • display with excess empty space

    In most cases, matching the expected aspect ratio is more important than choosing one exact width.

    Why WordPress Featured Images Get Cropped

    Featured images often get cropped because the theme forces them into a fixed container.

    Common reasons include:

    • hard-cropped thumbnail sizes
    • fixed-height blog cards
    • CSS using object-fit: cover
    • different image ratios on archive and single-post pages
    • mobile-specific layouts

    The safest design approach is to keep important elements away from the outer edges.

    This is especially important when the featured image contains:

    • text
    • faces
    • logos
    • product screenshots
    • icons

    Keep the main subject closer to the center so the image can survive reasonable cropping.

    Why Your WordPress Featured Image Looks Too Big

    If the featured image appears too large, the upload dimensions may not be the real problem.

    The theme may be using:

    • a full-width hero layout
    • 100% image width
    • a tall image container
    • no maximum height
    • CSS that scales the image aggressively

    Uploading a smaller file may reduce sharpness without fixing the layout.

    Instead, check:

    1. the theme’s featured image settings
    2. the rendered image dimensions
    3. the aspect ratio of the container
    4. the CSS or builder settings controlling height and width

    Why Your Featured Image Looks Blurry

    A blurry featured image usually means the browser is displaying the image larger than the source or generated version can support.

    Common causes include:

    • uploading a source image that is too small
    • WordPress serving a smaller generated image
    • the theme upscaling the image
    • over-compression
    • high-density displays exposing low resolution

    If your featured image displays at 1200 pixels wide, do not start with a 600-pixel-wide source.

    Use a source image large enough for the biggest expected display area, then let WordPress generate smaller responsive versions where appropriate.

    How WordPress Image Sizes Work

    When you upload an image, WordPress can generate multiple versions of that file.

    Common image sizes include:

    • thumbnail
    • medium
    • medium large
    • large
    • full size
    • custom theme or plugin sizes

    The important distinction is:

    Featured image describes the role the image plays on the post.

    Image size describes the generated version WordPress may serve.

    Your theme may choose a generated image size instead of the original upload.

    That is why an uploaded image can look different depending on where it appears.

    Should You Upload the Full-Size Image?

    You should upload an image that is large enough for your design, but there is little value in uploading an unnecessarily huge original.

    For example, a 5000-pixel-wide camera image is excessive if the widest display area on your site is 1200 pixels.

    Oversized originals can:

    • increase upload time
    • use more storage
    • create heavier image processing
    • increase the risk of serving oversized media

    A better approach is to resize the source before upload based on the largest realistic display need.

    Best File Format for WordPress Featured Images

    WebP

    WebP is a strong default for most WordPress featured images.

    It usually provides good visual quality at a smaller file size than older formats.

    For most NextWebOps publishing workflows, WebP should be the preferred option.

    JPEG

    JPEG remains suitable for photographs, especially when WebP is unavailable in the workflow.

    PNG

    PNG is useful when transparency or specific graphic requirements justify the larger file size.

    It should not be the automatic choice for every blog image.

    AVIF

    AVIF can produce excellent compression, but the best choice depends on your WordPress setup, browser support requirements, and image-processing workflow.

    How Large Should a Featured Image File Be?

    There is no universal kilobyte target.

    You will often see rules such as “keep featured images under 150 KB” or “under 200 KB.”

    Those can be useful goals, but they are not hard requirements.

    The ideal file size depends on:

    • image dimensions
    • visual complexity
    • file format
    • compression quality
    • expected display size

    The better rule is:

    Use the smallest file that still looks good at the size where it will actually be displayed.

    For broader optimization guidance, see our guide to image SEO.

    WordPress Featured Image Size and SEO

    Featured image dimensions do not directly improve rankings on their own, but image implementation can affect SEO through page performance and user experience.

    Important image SEO elements include:

    • appropriate dimensions
    • compression
    • descriptive filenames
    • useful alt text
    • responsive delivery
    • fast loading

    A 5000-pixel image served at 700 pixels wide wastes bandwidth.

    A 500-pixel image stretched across a wide hero section may look poor.

    The goal is to match source quality and delivery to the actual layout.

    Featured Images and Social Sharing

    Featured images are often reused when links are shared on:

    • Facebook
    • LinkedIn
    • X
    • messaging apps
    • other social platforms

    A wide image around 1200 × 630 pixels is commonly used because it works well for many link preview layouts.

    Still, social platforms can crop previews differently.

    Keep important text, logos, and subjects away from the edges.

    Should You Put Text on WordPress Featured Images?

    You can, but keep it simple.

    Text can help by:

    • reinforcing the article topic
    • making social previews clearer
    • creating a consistent visual system

    But too much text creates problems.

    It may become:

    • too small on mobile
    • cropped in archive cards
    • cropped on social platforms
    • duplicative of the page title

    Use short, large text and keep essential information in the HTML content rather than relying on the image alone.

    How to Find the Right Featured Image Size for Your Theme

    1. Check the theme documentation. Look for recommended featured image dimensions or aspect ratios.
    2. Inspect an existing page that looks correct. Note the displayed width and height.
    3. Identify the aspect ratio. This is often more important than the exact pixel count.
    4. Create a source image large enough for the widest use.
    5. Upload the image.
    6. Check the blog archive.
    7. Check the single-post view.
    8. Check mobile.
    9. Adjust the crop-safe area if needed.

    Astra, for example, documents 1200 × 628 pixels as a recommended featured image size in its own theme guidance. That is useful as a theme-specific example, not a universal WordPress rule.

    WordPress Featured Image Checklist

    Before Upload

    • Confirm the aspect ratio.
    • Resize the source appropriately.
    • Compress the file.
    • Use WebP where appropriate.
    • Use a descriptive filename.
    • Keep important visual elements away from crop-prone edges.

    After Upload

    • Add appropriate alt text.
    • Set the correct featured image.
    • Check the archive card.
    • Check the single-post layout.
    • Check mobile.
    • Check the image for blurriness.
    • Check social previews when they matter.

    These checks should also be part of your broader content QA checklist.

    Common WordPress Featured Image Mistakes

    • Assuming one size fits every theme: Theme layout determines the real requirement.
    • Uploading images that are too small: They may be stretched and look blurry.
    • Uploading giant originals: This increases unnecessary file weight and processing.
    • Ignoring aspect ratio: This is one of the main causes of awkward cropping.
    • Putting important text near the edges: Archive and social crops may cut it off.
    • Using PNG for every image: Many images can be substantially lighter in WebP or JPEG.
    • Skipping compression: Large image files can slow page delivery.
    • Forgetting alt text: Important informational images need useful descriptions.
    • Checking only desktop: Mobile may crop or scale differently.
    • Ignoring archive cards: The image may look fine on the article page but poor in blog listings.
    • Using inconsistent aspect ratios: Blog grids may look messy.
    • Assuming uploaded size equals displayed size: WordPress and the theme may serve a generated derivative.

    A Practical WordPress Featured Image Workflow

    A repeatable image process makes publishing faster and more consistent.

    Use this sequence:

    Define dimensions → design image → export WebP → compress → rename file → add alt text → upload → set featured image → check archive → check article → check mobile

    That image process should sit inside your broader content publishing workflow.

    If your team publishes frequently, standardizing one approved aspect ratio can reduce cropping problems and speed up image production.

    When Should You Use a Different Featured Image Size?

    You may need a different format when:

    • the theme uses a full-width hero
    • the blog archive uses square cards
    • the site uses portrait cards
    • you have a separate social image workflow
    • a page builder requires a specific container ratio

    The best size should follow the design system, not a generic blog rule.

    Does WordPress Automatically Resize Featured Images?

    WordPress can generate multiple versions of uploaded images, and your theme may use one of those generated sizes for the featured image.

    However, the exact behavior depends on the theme and plugins installed.

    This is another reason to inspect the rendered page rather than assuming the uploaded file is what visitors receive.

    Need Help With WordPress Featured Images?

    Preparing images correctly takes more than selecting a pixel size.

    A complete workflow can include:

    • resizing
    • WebP conversion
    • compression
    • descriptive filenames
    • alt text
    • featured image assignment
    • mobile checks
    • archive-page QA

    If your content is ready but you need help preparing and publishing images correctly, get help with WordPress image optimization and publishing.

    Final Thoughts on WordPress Featured Image Size

    There is no single perfect WordPress featured image size for every site.

    1200 × 630 pixels is a useful general-purpose starting point, but your theme’s aspect ratio and display behavior should determine the final choice.

    The best workflow is to:

    • check the theme
    • match the expected aspect ratio
    • use sufficient source resolution
    • compress before upload
    • prefer WebP where appropriate
    • keep important elements inside a safe crop area
    • check archive, article, mobile, and social layouts

    NextWebOps helps businesses and agencies with WordPress publishing, image optimization, alt text, metadata, content formatting, internal linking, and publishing QA.

    Contact NextWebOps for WordPress publishing support.

    Frequently Asked Questions

    What is the best WordPress featured image size?

    Around 1200 × 630 pixels is a useful general-purpose starting point, but the best size depends on your theme’s layout and preferred aspect ratio.

    Is 1200 × 630 a good WordPress featured image size?

    Yes, it works well for many blog layouts and social previews. However, themes that use 16:9, square, or portrait layouts may require a different ratio.

    Why is my WordPress featured image too big?

    The theme may be displaying the image in a full-width or tall hero container. Check the layout and CSS before simply reducing the uploaded file size.

    Why is my featured image blurry?

    The source image may be too small, overly compressed, or WordPress may be serving a smaller generated version that the theme then enlarges.

    What aspect ratio should a WordPress featured image use?

    Use the aspect ratio expected by your theme. Around 1.91:1 is common for wide blog and social images, while 16:9 and 1:1 are also common.

    Does WordPress automatically resize images?

    Yes, WordPress can generate multiple image sizes after upload. Themes and plugins may also register custom sizes and choose which version to display.

    Should I use WebP for WordPress featured images?

    WebP is a strong choice for most featured images because it can provide good visual quality at a relatively small file size.

    Is PNG or JPEG better for WordPress?

    JPEG is usually more efficient for photographs. PNG is better when transparency or certain graphic requirements are necessary. WebP is often a better general-purpose web format.

    How large should a featured image file be?

    There is no universal file-size limit. Aim for the smallest file that still looks sharp at its real display size.

    Why does WordPress crop featured images?

    The theme or layout may force the image into a fixed aspect ratio or height. Cropping is common when the source ratio does not match the display container.

    What size should WordPress blog images be?

    Featured images around 1200 pixels wide are often sufficient for standard blog layouts, but inline images should be sized according to the content column and the specific visual purpose.

    How do I find the correct image size for my WordPress theme?

    Check the theme documentation, inspect an existing correctly displayed image, determine the rendered aspect ratio, and test the image across archive, single-post, and mobile layouts.

  • WordPress Categories vs Tags: How to Use Them Correctly

    WordPress Categories vs Tags: How to Use Them Correctly

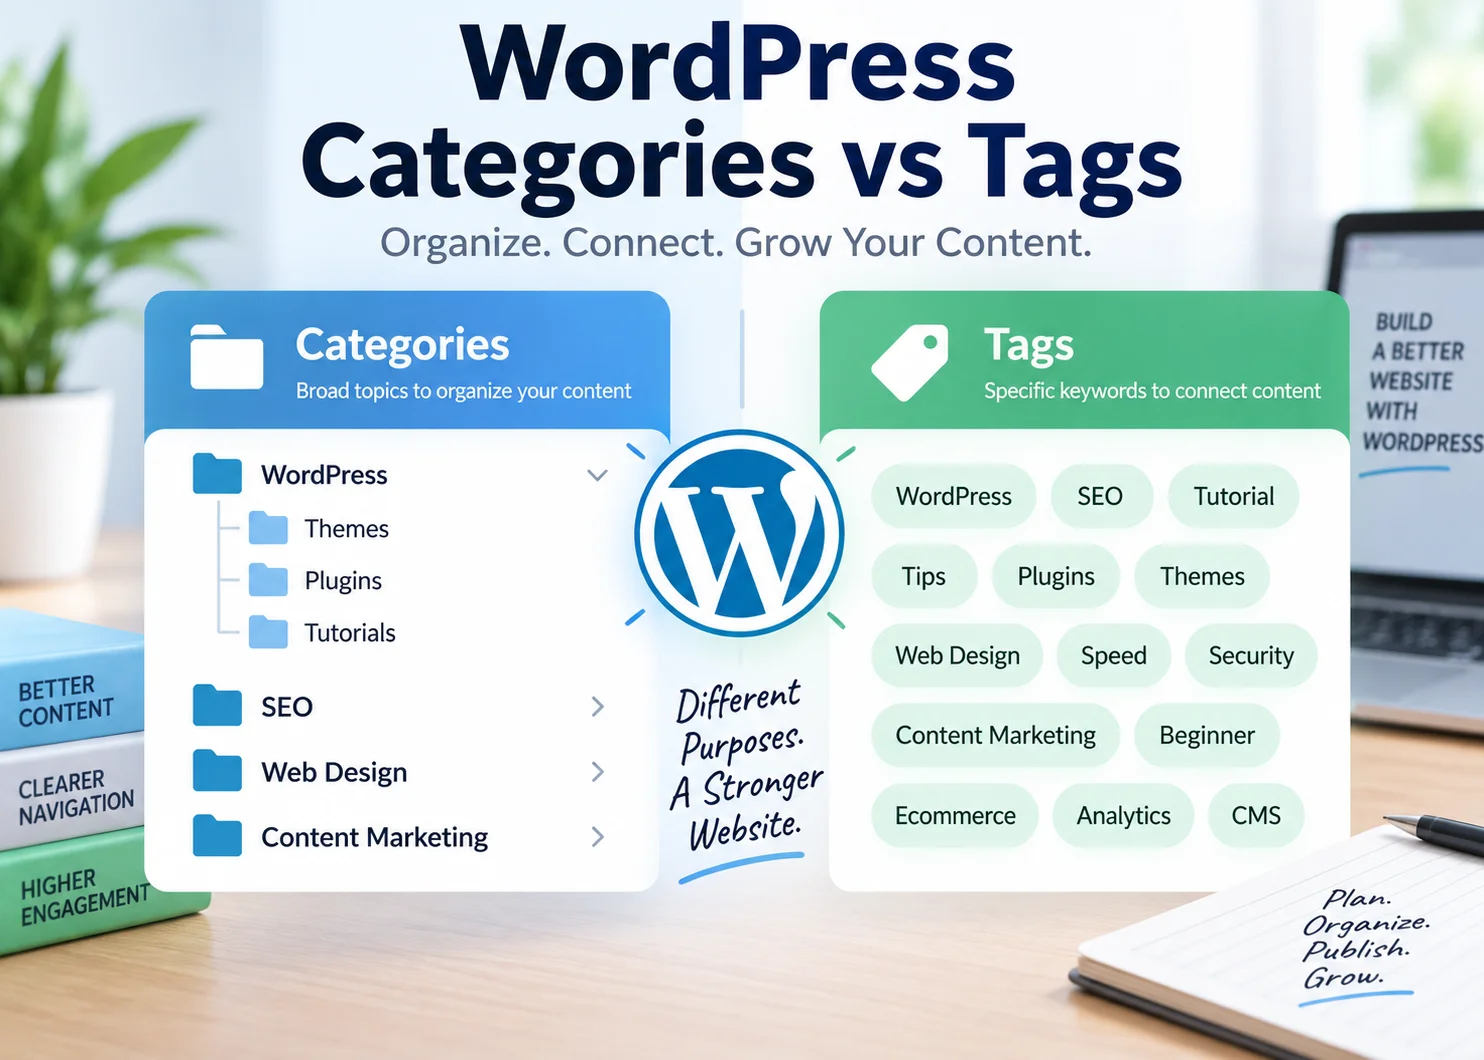
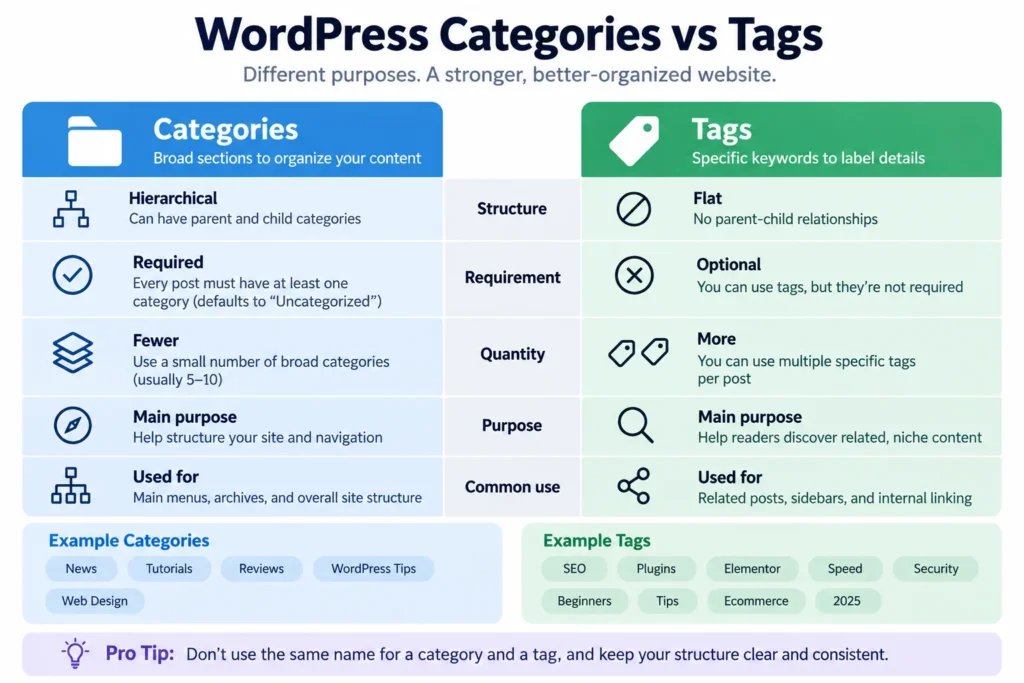
    WordPress categories vs tags is a simple comparison on the surface: categories group posts into broad topics, while tags describe more specific subjects.

    But the practical decision is more important than the definition.

    Using too many categories or creating a new tag for every article can leave a WordPress site with dozens or hundreds of thin archive pages, inconsistent navigation, and a taxonomy structure that becomes harder to manage over time.

    The goal is not to use every organizational feature WordPress provides. The goal is to create categories and tags that help visitors understand your content and make the site easier to maintain.

    WordPress Categories vs Tags at a Glance

    Feature Categories Tags
    Primary purpose Organize content into broad topic groups Connect content through more specific topics
    Required Posts are assigned to a category Optional
    Hierarchical Yes No
    Parent/child structure Supported Not supported
    Best use Site structure and broad navigation Cross-topic discovery
    Archive pages Yes Yes
    SEO risk when overused Overlapping or unnecessary archives Large numbers of thin archive pages

    The official Learn WordPress guide to categories and tags makes the same basic distinction: categories help separate a blog into broader topics, while tags connect posts through more specific subjects.

    What Are WordPress Categories?

    Categories are the main organizational system for WordPress posts.

    They usually represent the broad topics a site publishes about regularly.

    For example, a digital marketing site might use categories such as:

    • SEO
    • WordPress
    • Shopify
    • Webflow
    • Content Management

    A category should usually make sense as a destination someone might intentionally browse.

    Categories Can Be Hierarchical

    WordPress categories can use parent and child relationships.

    For example:

    • SEO
      • On-Page SEO
      • Technical SEO
      • Content SEO

    This hierarchy can be useful when a broad topic has enough content to justify deeper organization.

    Do not create subcategories just because WordPress allows them. A deep taxonomy tree adds complexity and should only exist when it improves navigation.

    Every Standard WordPress Post Has a Category

    If you publish a post without selecting a category, WordPress assigns the site’s default category.

    On a fresh installation, that category is often named Uncategorized.

    That is rarely a good long-term destination for important content.

    If your site still uses Uncategorized, rename the default category or assign posts to intentional topic groups.

    What Are WordPress Tags?

    Tags are optional labels that connect posts around narrower topics.

    Unlike categories, tags do not support parent and child relationships.

    They are flat.

    Imagine a NextWebOps-style content structure with these categories:

    • WordPress
    • Shopify
    • Webflow

    Several articles across those categories might discuss:

    • internal linking
    • metadata
    • image optimization
    • publishing QA

    Those recurring cross-platform topics could potentially work as tags if each archive would contain enough useful content.

    The important word is potentially.

    You do not need to create a tag just because a phrase appears in an article.

    The Key Differences Between Categories and Tags

    Categories Define Broad Structure

    Categories should describe the major areas of your content library.

    If someone looked at your category list, they should quickly understand what the site publishes.

    Tags Describe Specific Topics

    Tags are better suited to narrower subjects that may appear across multiple categories.

    For example:

    Category: Shopify

    Tags: internal linking, product pages, image optimization

    Categories Are Hierarchical; Tags Are Flat

    A category can have subcategories.

    A tag cannot.

    This makes categories useful for structured navigation and tags better for non-hierarchical relationships.

    Categories Are Expected; Tags Are Optional

    A WordPress site can work perfectly well without tags.

    This is one of the most important points for publishers to understand.

    If tags do not improve navigation or create useful archives, do not use them simply because WordPress includes a Tags field.

    WordPress.com’s categories vs. tags documentation also describes tags as more specific keywords that can be used to organize related content.

    WordPress Categories vs Tags for SEO

    Categories and tags are not automatic SEO improvements.

    Each category and tag can create an archive page, and the usefulness of that archive matters more than the taxonomy label itself.

    A Useful Taxonomy Archive

    A strong category or tag archive may:

    • group several closely related posts
    • help visitors discover more content
    • support a clear site structure
    • serve a meaningful search intent
    • create internal linking pathways

    For important category archives, adding useful introductory copy can also make the page clearer for visitors.

    A Weak Taxonomy Archive

    A weak archive may contain:

    • only one post
    • almost the same posts as another archive
    • randomly grouped content
    • no unique value
    • a tag that will never be used again

    This becomes a common problem when publishers treat tags like SEO keywords.

    If every post gets five completely new tags, a site with 200 posts could end up with hundreds of archive URLs that offer little value.

    The problem is not that tags are inherently bad for SEO. The problem is uncontrolled taxonomy creation.

    For broader page-level optimization, use an on-page SEO checklist instead of expecting categories or tags to compensate for weak content optimization.

    Should You Use Both Categories and Tags?

    Not necessarily.

    A small or focused site may only need categories.

    Use tags when they provide a real browsing benefit.

    A useful tag should usually:

    • apply to multiple posts
    • represent a recurring topic
    • connect content across categories
    • create an archive someone might actually browse

    If those conditions are not met, skip the tag.

    How Many Categories Should a WordPress Site Have?

    There is no universal number.

    You will often see advice suggesting five to ten categories, but that should not be treated as a fixed SEO rule.

    A small site may need four.

    A large publication may legitimately need many more.

    The better rule is:

    Use the smallest number of categories needed to represent your major recurring content areas clearly.

    Ask:

    • Is this topic important enough to have multiple posts?
    • Would visitors understand this label?
    • Will we continue publishing about it?
    • Does it overlap heavily with another category?

    If a category exists for only one article and has no obvious future, it may be too narrow.

    How Many Categories Should One Post Use?

    WordPress allows a post to be assigned to multiple categories.

    That does not mean every post should have several.

    In most cases, one clear primary category is enough.

    Add another only when the article genuinely belongs in both locations and doing so improves discovery.

    Avoid assigning every article to three or four categories merely to increase exposure.

    That can make the category structure less meaningful and cause archives to overlap excessively.

    How Many Tags Should You Add to a WordPress Post?

    There is no ideal tag count.

    Do not optimize for a number such as three, five, or ten tags per post.

    Instead, ask these questions before adding each tag:

    • Does this tag already exist?
    • Will several posts use it?
    • Would a visitor benefit from clicking it?
    • Is it different from an existing category?
    • Will the archive remain useful over time?

    If the answer is mostly no, the tag probably should not exist.

    WordPress Categories vs Tags Examples

    WordPress taxonomy example showing categories and tags across related website content

    Example 1: SEO Blog

    Category: On-Page SEO

    Possible tags:

    • internal linking
    • metadata
    • image optimization

    Example 2: Ecommerce Content Site

    Category: Shopify SEO

    Possible tags:

    • product pages
    • collection pages
    • alt text

    Example 3: Content Operations Site

    Category: Content Management

    Possible tags:

    • publishing QA
    • content workflow
    • CMS publishing

    A Poor Taxonomy Example

    Category: SEO

    Tag: SEO

    Using the exact same label as both a category and a tag generally creates two taxonomy archives with very similar purposes.

    That adds complexity without improving navigation.

    When Should You Create a New Category?

    Create a category when the topic:

    • represents a major area of the site
    • will contain several posts
    • has long-term publishing value
    • makes sense as a navigation destination
    • is distinct from existing categories

    Do not create a new category simply because one article covers a new phrase.

    A category is part of the site’s structure, not just a label attached to a post.

    When Should You Create a New Tag?

    Create a tag when the topic:

    • appears across multiple posts
    • may cross category boundaries
    • helps people discover related content
    • is likely to remain relevant

    Avoid creating tags for:

    • one-off phrases
    • every keyword in an article
    • singular and plural versions of the same term
    • slightly different spellings
    • topics that already exist as categories

    Common WordPress Category and Tag Mistakes

    Leaving Important Posts in Uncategorized

    Uncategorized is a default system label, not a useful content strategy.

    Creating a Category for Every Article

    Categories should group content. A category with one article usually provides little organizational value.

    Creating Unique Tags for Every Post

    This creates large numbers of one-post archive pages.

    Using the Same Name for a Category and Tag

    This often produces redundant taxonomy structures.

    Creating Singular and Plural Duplicates

    Examples:

    • WordPress Plugin
    • WordPress Plugins

    Choose one consistent version.

    Using Spelling Variants as Separate Tags

    Examples such as “ecommerce” and “e-commerce” should not become separate tags unless there is a very specific reason.

    Assigning Too Many Categories

    If every post appears in most categories, the categories stop communicating meaningful structure.

    Treating Tags as SEO Keywords

    A tag field is not a keyword field.

    Adding every target keyword as a tag does not automatically improve rankings.

    Ignoring Taxonomy Archives

    Remember that categories and tags are not only backend labels. They may create public URLs.

    Review those pages as part of your content QA checklist.

    What Happens If You Delete a Category or Tag?

    Deleting a category or tag does not normally delete the posts that were assigned to it.

    However, the taxonomy archive itself is removed.

    For categories, posts still need a category assignment, so review where affected posts belong before restructuring the taxonomy.

    For tags, deleting the tag removes that organizational relationship from the posts.

    Consider the SEO Impact Before Deleting an Archive

    Before removing an established category or tag, check whether its archive URL:

    • receives organic traffic
    • has backlinks
    • ranks for useful queries
    • is linked internally

    If the old archive had value and there is a clear replacement, a redirect may be appropriate.

    Do not bulk-delete taxonomy terms without reviewing the resulting URLs.

    Should Category and Tag Archives Be Indexed?

    There is no universal answer.

    Consider Indexing an Archive When

    • it contains several useful posts
    • the grouping is meaningful
    • the page helps users discover content
    • it can satisfy a search intent
    • the archive is maintained

    Consider Noindexing an Archive When

    • it is very thin
    • it duplicates another taxonomy grouping
    • it exists only because tags were created automatically
    • it offers little value beyond listing one or two posts

    The decision should be based on archive quality rather than a blanket rule such as “index all categories” or “noindex all tags.”

    A Simple WordPress Taxonomy Strategy

    If you are building a new WordPress site, use this process:

    1. List the major topics you expect to publish about repeatedly.
    2. Turn those into a small, understandable category structure.
    3. Publish enough content to make those category archives useful.
    4. Add tags only when recurring cross-category topics emerge naturally.
    5. Review archives periodically for thin or redundant pages.
    6. Merge overlapping taxonomy terms where appropriate.
    7. Update internal links and redirects when taxonomy URLs change.

    This creates a much more maintainable structure than inventing categories and tags article by article.

    Categories, Tags, and Internal Linking

    Taxonomies can support discovery, but they should not replace contextual internal links.

    A category archive can help a visitor browse related content, while links inside the body of an article can point directly to the most relevant supporting resource.

    Use both intentionally.

    For stronger site structure, follow internal linking best practices alongside a clean taxonomy system.

    If your WordPress site already has years of inconsistent categories, tags, and internal links, get help cleaning up your WordPress content structure.

    Categories and Tags in Your Publishing Workflow

    Category and tag decisions should be made before the page is published, not improvised at the final moment.

    Add taxonomy selection to your content publishing workflow.

    Before publishing, confirm:

    • the correct primary category is selected
    • the post has not been left in Uncategorized
    • any tag being added already serves a useful purpose
    • no duplicate taxonomy term exists
    • spelling and capitalization are consistent
    • the resulting archive page makes sense

    This is especially important when several writers or publishers work on the same site.

    Without agreed taxonomy rules, one person may create “Content Marketing,” another may create “content marketing,” and a third may create “Content-Marketing.”

    Standardization prevents that problem.

    Should WordPress Pages Use Categories and Tags?

    By default, WordPress categories and tags are primarily associated with posts rather than standard pages.

    Plugins or custom development can add taxonomy support to pages, but that does not mean every site needs it.

    Before extending categories or tags to pages, ask whether the taxonomy improves actual navigation and content relationships.

    Adding classification options without a clear information architecture often creates more maintenance work than value.

    Do WordPress Tags Help Navigation?

    They can, when used consistently.

    A useful tag lets a reader move from one article to several genuinely related articles around a narrower topic.

    For example, a visitor reading a WordPress article about internal linking might click an internal linking tag and discover relevant Shopify and SEO articles on the same subject.

    That is useful cross-topic discovery.

    A tag that leads to one unrelated post is not.

    How to Clean Up an Existing WordPress Tag Mess

    Older WordPress sites often accumulate large tag libraries because every writer created terms independently.

    Start by exporting or reviewing all existing categories and tags.

    Then group them into:

    • keep
    • merge
    • rename
    • delete

    Look for:

    • one-post tags
    • duplicate terms
    • singular/plural duplicates
    • category/tag duplication
    • misspellings
    • terms with no remaining business relevance

    Before deleting anything, evaluate the public archive URLs and decide whether redirects are necessary.

    After cleanup, document the allowed categories and rules for creating future tags.

    Final Thoughts on WordPress Categories vs Tags

    The difference between WordPress categories and tags is straightforward:

    Categories organize broad content areas. Tags connect posts through narrower topics.

    The harder part is using them with restraint.

    A clean WordPress taxonomy should help visitors understand the site, find related content, and move through meaningful archives.

    That usually means:

    • a focused category structure
    • one clear primary category for most posts
    • tags only when they serve a real discovery purpose
    • no duplicate category/tag labels
    • regular archive cleanup
    • taxonomy checks inside the publishing workflow

    NextWebOps helps businesses and agencies with WordPress publishing, taxonomy organization, content formatting, metadata, internal linking, content migration, and final publishing QA.

    Contact NextWebOps for WordPress content management support.

    Frequently Asked Questions

    What is the difference between categories and tags in WordPress?

    Categories are broad, hierarchical groupings used to organize major areas of WordPress content. Tags are optional, flat labels used to connect posts around more specific topics.

    Do I need both categories and tags in WordPress?

    No. Every post needs a category assignment, but tags are optional. A site can use categories only if tags do not add meaningful navigation or discovery value.

    Are categories or tags better for SEO?

    Neither is automatically better. Their SEO value depends on the quality and usefulness of the archive pages they create. Useful archives can support navigation and site structure, while thin or redundant archives may add unnecessary URLs.

    How many categories should a WordPress site have?

    There is no fixed number. Use enough categories to represent the site’s main recurring content areas without creating unnecessary overlap.

    How many categories should a WordPress post use?

    One clear primary category is usually enough. Additional categories should only be used when they genuinely improve organization and discovery.

    How many tags should I add to a WordPress post?

    There is no ideal number. Only use tags that apply to multiple posts and create useful archive pages. Do not add tags simply to reach a target count.

    Can I use the same name for a category and a tag?

    WordPress can technically support separate taxonomy terms with the same or similar names, but doing so usually creates redundant archives and unnecessary complexity.

    Do WordPress tags help SEO?

    Tags can support content discovery and internal organization when their archive pages are useful. Creating large numbers of thin tags does not automatically improve SEO.

    Should category and tag pages be indexed?

    Useful, well-maintained archives may be worth indexing. Thin, redundant, or automatically created archives may be better kept out of search results. The decision should be made based on page quality.

    What happens if I delete a category or tag?

    The posts themselves are not normally deleted. However, the taxonomy archive URL is removed, so review traffic, backlinks, internal links, and redirect needs before deleting established terms.

    Can WordPress pages have categories and tags?

    Standard WordPress pages do not normally use post categories and tags by default. Plugins or custom development can add taxonomy support, but it should only be done when it improves the site’s information architecture.

    Should I use subcategories?

    Use subcategories when a broad category contains enough content to justify a clear second level of organization. Avoid deep category trees that make navigation more complicated without helping users.

  • Content Publishing Workflow: A 10-Step Process From Draft to Live Page

    Content Publishing Workflow: A 10-Step Process From Draft to Live Page

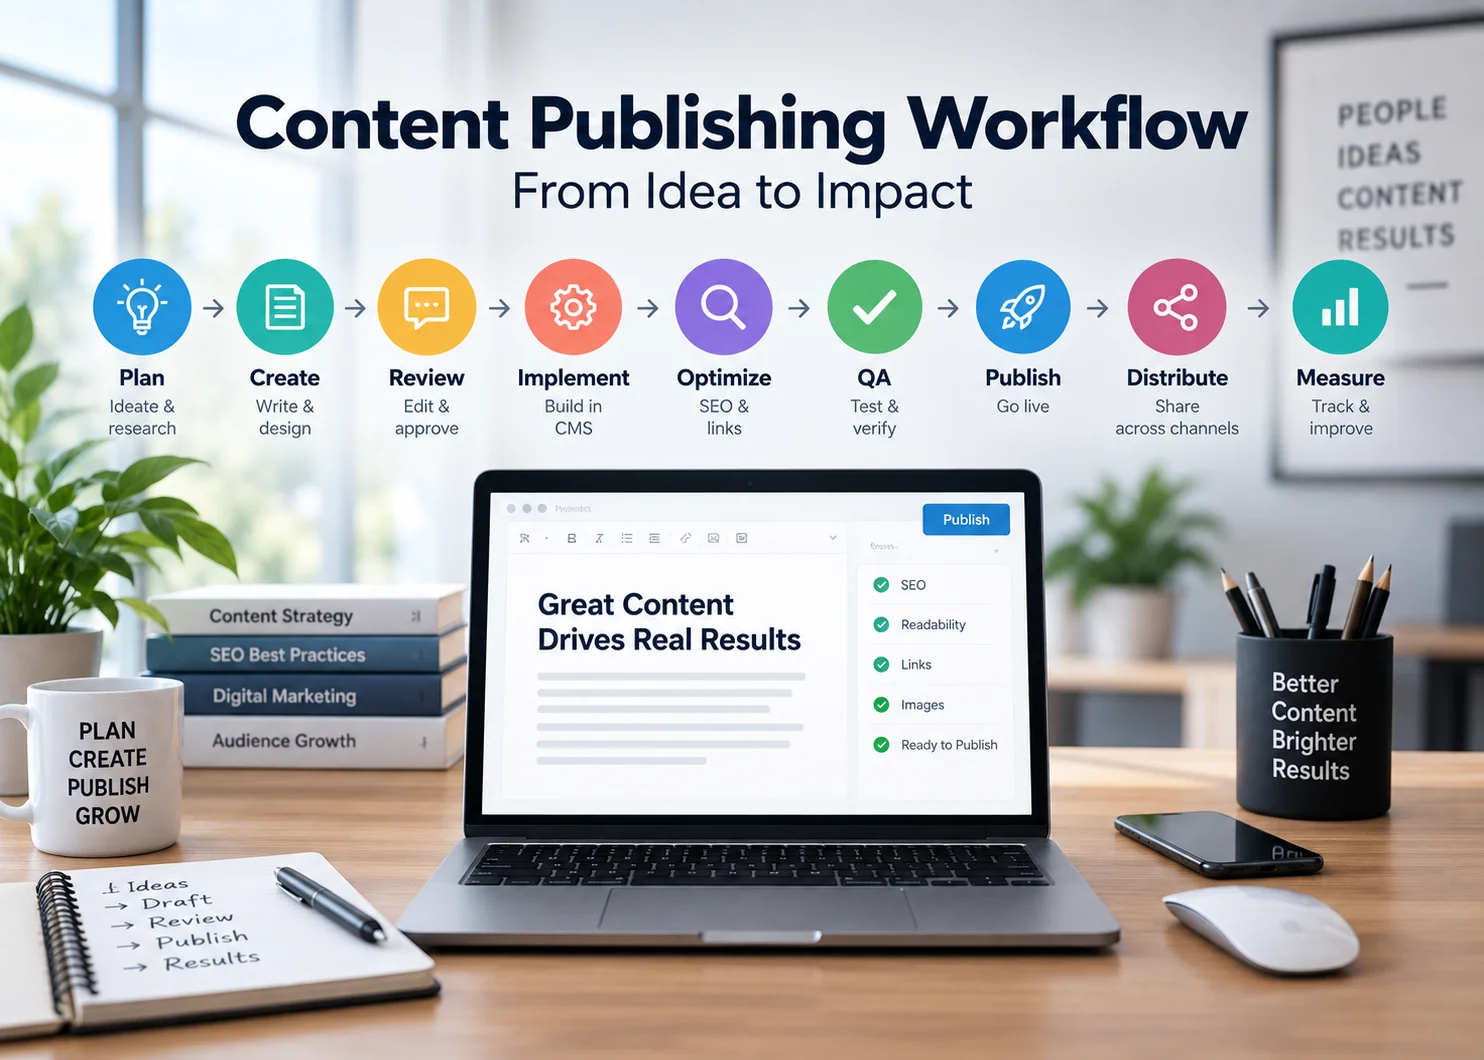
    A strong content publishing workflow turns finished ideas into accurate, optimized, and properly published web pages without relying on last-minute fixes.

    Creating the content is only part of the job. A good article can still go live with the wrong draft, missing metadata, broken links, oversized images, inconsistent headings, no internal links, or a CTA that leads nowhere.

    The solution is a repeatable process that covers more than writing and approval.

    For website content, an effective workflow should move through planning, creation, review, CMS implementation, on-page SEO, image optimization, quality assurance, publication, live-page verification, indexing, and distribution.

    This guide breaks that process into 10 practical steps that can be used for WordPress, Shopify, Webflow, and other content management systems.

    What Is a Content Publishing Workflow?

    A content publishing workflow is a defined sequence of steps, responsibilities, approvals, and handoffs that moves a piece of content from planning to publication and beyond.

    Shopify describes a content workflow as a template that represents the steps, roles, and responsibilities involved in producing content. Its current content workflow guidance also distinguishes between task-based and status-based approaches.

    A workflow might include:

    • topic selection
    • keyword research
    • content briefing
    • writing
    • editing
    • approval
    • CMS implementation
    • SEO
    • quality assurance
    • publishing
    • post-publish checks
    • distribution

    The exact structure depends on the team, but the principle is the same: each stage should have a clear owner, expected output, and definition of completion.

    Why a Content Publishing Workflow Matters

    It Reduces Publishing Errors

    A documented workflow makes it harder to forget recurring tasks such as:

    • adding metadata
    • checking image alt text
    • testing internal links
    • assigning a category
    • reviewing the mobile layout
    • checking the final live URL

    Without a process, these tasks often depend on whoever happens to remember them.

    It Creates Clear Ownership

    A publishing workflow should make it obvious who is responsible for each stage.

    Depending on the organization, that may include:

    • SEO strategist
    • writer
    • editor
    • designer
    • content manager
    • CMS publisher
    • QA reviewer
    • marketing manager

    Clear ownership reduces the familiar problem of a piece of content sitting in a shared folder because everyone assumes someone else is handling the next step.

    It Makes Publishing Faster

    Structure does not have to create bureaucracy.

    A well-designed process can reduce unnecessary questions because every person knows what information they should receive and what they need to deliver next.

    Contentful’s content workflow guidance highlights faster publishing, clearer collaboration, and quality control as important benefits of a defined process.

    It Improves Consistency

    Without a standard workflow, one article may receive careful SEO implementation while the next goes live without optimized images or internal links.

    A repeatable process helps teams apply the same baseline standards across every page.

    It Makes Content Operations Easier to Scale

    Publishing ten pages is different from publishing hundreds across multiple websites, products, regions, or clients.

    As volume increases, informal processes become harder to manage.

    Adobe’s content lifecycle guidance notes that growing teams can face fragmented workflows, disconnected tools, and inconsistent brand execution when planning and publishing are not treated as one connected operation.

    The 10-Step Content Publishing Workflow

    1. Define the Content Goal and Search Intent

    The publishing process should begin before anyone starts writing.

    Document:

    • target audience
    • primary keyword
    • search intent
    • content purpose
    • page type
    • CTA
    • publication destination

    For SEO content, this information should normally be captured in a structured SEO content brief.

    A useful brief prevents the writer from producing a strong article for the wrong query or audience.

    2. Create the Draft and Supporting Assets

    Once the direction is approved, create the primary content and identify the assets needed to publish it.

    That may include:

    • article copy
    • featured image
    • supporting images
    • charts
    • screenshots
    • downloadable files
    • source references

    Use a clear versioning system.

    A publisher should never have to guess whether final-v2-revised-new.docx or final-v3-use-this.docx is the approved version.

    Where possible, store the final approved content in one source of truth.

    3. Complete Editorial and Factual Review

    Before implementation, review the draft for both writing quality and factual accuracy.

    Check:

    • spelling
    • grammar
    • brand voice
    • names
    • dates
    • statistics
    • technical claims
    • source quality

    Use a clear approval status such as:

    Draft → In Review → Approved

    This is important because publishing from a half-reviewed version creates expensive rework later.

    4. Prepare a Complete Publishing Package

    This is the stage many teams skip.

    Do not hand a publisher only a Word document and expect them to figure out everything else.

    A complete publishing package should include:

    • final post or page title
    • approved body copy
    • primary keyword
    • SEO title
    • meta description
    • URL slug
    • featured image
    • supporting images
    • filenames
    • image alt text
    • internal-link targets
    • external references
    • CTA destinations
    • category
    • tags where relevant
    • schema type where applicable

    This package removes ambiguity and separates content decisions from mechanical implementation.

    5. Implement the Content in the CMS

    CMS implementation is more than copy and paste.

    The publisher should recreate the intended content structure accurately inside WordPress, Shopify, Webflow, or another platform.

    Review:

    • heading hierarchy
    • paragraph breaks
    • bullet lists
    • numbered lists
    • tables
    • buttons
    • callout boxes
    • internal links
    • external links
    • images
    • embeds
    • spacing

    The draft and the live page are different environments. A nicely formatted document can become difficult to scan once pasted into a CMS.

    If your team has approved content but spends too much time formatting, linking, and staging pages manually, get help with content publishing implementation.

    6. Complete On-Page SEO During Implementation

    On-page SEO should be built into publishing rather than treated as a separate task after the page goes live.

    During implementation, confirm:

    • SEO title
    • meta description
    • URL slug
    • heading structure
    • primary keyword placement
    • internal links
    • image alt text
    • schema type where appropriate

    Internal links should connect the new page to relevant existing resources using descriptive anchor text. Follow established internal linking best practices rather than adding links only to satisfy an arbitrary count.

    This stage should also identify older content that can link into the new page after publication.

    7. Optimize Images and Media

    Images should be prepared before they are uploaded.

    Check:

    • dimensions
    • compression
    • file format
    • filename
    • alt text
    • visual quality
    • placement
    • mobile rendering

    Use formats such as WebP where appropriate and avoid uploading unnecessarily large original files directly from a designer or camera.

    The broader image SEO workflow should support both page performance and search visibility without sacrificing visual quality.

    8. Run Pre-Publish Content QA

    Once the page has been implemented, stop editing and review it as a nearly finished page.

    Use a repeatable content QA checklist to review:

    • copy
    • facts
    • headings
    • metadata
    • internal links
    • external links
    • CTA destinations
    • images
    • alt text
    • formatting
    • accessibility
    • mobile layout
    • placeholder text
    • indexing settings

    QA should have a clear result:

    Pass / Fixes Required

    Do not let “reviewed” become an undefined status where nobody knows whether the page is actually ready.

    9. Publish and Verify the Live Page

    Clicking Publish is not the final step.

    Open the public URL immediately and inspect what users actually see.

    Verify:

    • page title
    • headings
    • paragraph spacing
    • images
    • internal links
    • external links
    • CTA buttons
    • forms
    • desktop layout
    • mobile layout
    • SEO metadata
    • canonical URL
    • indexability

    This catches problems that a preview may not reveal.

    Examples include:

    • theme styles overriding formatting
    • images appearing too large
    • tables overflowing on mobile
    • buttons inheriting the wrong style
    • links pointing to staging URLs
    • unexpected noindex settings

    10. Add Incoming Links, Index, Distribute, and Monitor

    A content workflow should continue after publication.

    Add Incoming Internal Links

    Find older relevant pages and add contextual links to the newly published URL.

    This is one of the easiest publishing steps to forget.

    A new article may contain five outgoing internal links but still have no existing page linking back to it.

    That weakens the site’s internal content relationships and can leave useful resources isolated.

    Request Indexing

    For important new URLs:

    • open Google Search Console
    • use URL Inspection
    • paste the new URL
    • request indexing
    • confirm the page is included in the appropriate sitemap

    Distribute the Content

    Share the new asset through relevant channels such as:

    • LinkedIn
    • Facebook
    • email newsletters
    • internal sales or support channels

    Distribution should match the audience rather than automatically posting everywhere.

    Monitor Performance

    Over time, review:

    • search impressions
    • organic clicks
    • rankings
    • engagement
    • conversions
    • new internal-link opportunities

    The workflow should feed useful performance information back into future planning.

    Content Publishing Workflow Example

    Imagine a company is publishing an article targeting the keyword Shopify internal linking.

    A complete workflow might look like this:

    1. Research the keyword and SERP.
    2. Create and approve an SEO content brief.
    3. Write the article.
    4. Complete editorial and factual review.
    5. Create the featured and supporting images.
    6. Prepare metadata, slug, links, and image information.
    7. Implement the article in WordPress.
    8. Add SEO metadata and contextual internal links.
    9. Run pre-publish QA.
    10. Publish and inspect the live page.
    11. Update relevant older Shopify articles with links into the new page.
    12. Request indexing in Google Search Console.
    13. Publish the social post.
    14. Monitor search performance and update the page when needed.

    The key difference is that the process does not stop when the article is written—or even when Publish is clicked.

    Content Publishing Workflow Template

    Content publishing workflow template showing stages, owners, approvals and publishing tasks

    The following framework can be adapted for a small team, agency, or in-house content operation.

    Stage Owner Status Required Output
    Brief SEO / Strategist Approved Keyword, intent, outline, CTA
    Draft Writer Complete Finished copy
    Editorial Review Editor Approved Fact-checked final copy
    Publishing Package Content Manager Ready Metadata, images, links, category
    CMS Implementation Publisher Complete Staged page
    SEO Implementation SEO / Publisher Complete Metadata, links, schema
    QA QA Reviewer Approved Passed checklist
    Publish Publisher Live Live URL
    Post-Publish SEO / Publisher Complete Incoming links, indexing, sitemap check
    Distribution Marketing Complete Social/email promotion

    The exact job titles are less important than clear ownership.

    For a small team, one person may handle several rows. For a larger organization, each stage may involve a different specialist.

    Need a repeatable publishing process across WordPress, Shopify, or Webflow? Discuss your content publishing workflow with NextWebOps.

    Task-Based vs. Status-Based Content Workflows

    Shopify’s workflow guidance describes two common approaches: task-based and status-based workflows.

    Task-Based Workflow

    A task-based workflow tracks individual actions.

    For example:

    • add meta description
    • compress featured image
    • insert internal links
    • check mobile layout
    • request indexing

    This approach works well when:

    • the publishing process is detailed
    • multiple people are involved
    • team members are still learning the process
    • QA consistency is important

    Status-Based Workflow

    A status-based workflow tracks broader stages.

    For example:

    Planned → Writing → Review → Ready to Publish → Published

    This can work well for smaller or experienced teams that do not need every individual action visible at the project level.

    A Hybrid Approach Usually Works Well

    A practical system is to use broad statuses for project management and detailed checklists inside each stage.

    For example:

    Status: Ready for QA

    Checklist:

    • metadata added
    • images compressed
    • links tested
    • mobile reviewed
    • CTA tested

    This keeps the workflow easy to scan without losing important implementation details.

    Content Publishing Workflow for WordPress, Shopify, and Webflow

    WordPress Publishing Workflow

    WordPress implementation may include:

    • post title
    • body formatting
    • heading hierarchy
    • category
    • tags
    • featured image
    • supporting images
    • SEO plugin fields
    • internal links
    • preview
    • live-page QA

    When using Rank Math, confirm the focus keyword, SEO title, meta description, slug, schema, and category before publication.

    Shopify Publishing Workflow

    Shopify publishing may involve:

    • product descriptions
    • collection content
    • blog posts
    • media
    • image alt text
    • search engine listing fields
    • internal links
    • product variants
    • live storefront QA

    The workflow should reflect the page type rather than using exactly the same checklist for products, collections, and articles.

    Webflow Publishing Workflow

    Webflow CMS publishing may require checks for:

    • CMS fields
    • collection templates
    • page titles
    • meta descriptions
    • image alt text
    • links
    • responsive behavior
    • published-domain rendering

    Template-based systems deserve careful QA because a content or template error may affect many URLs.

    Where Automation Helps—and Where It Should Not Replace QA

    Automation can make a publishing workflow faster when it handles predictable, repetitive tasks.

    Useful examples include:

    • task assignment
    • status updates
    • approval reminders
    • scheduled publishing
    • broken-link scans
    • image compression
    • workflow notifications
    • metadata validation

    Automation becomes risky when teams assume it removes the need for human review.

    Keep human QA for areas such as:

    • factual accuracy
    • brand voice
    • visual presentation
    • contextual internal linking
    • CTA relevance
    • accessibility judgment
    • live-page review

    The goal is not to automate everything. It is to automate repetitive work while preserving judgment where context matters.

    Common Content Publishing Workflow Mistakes

    • Unclear ownership: Nobody knows who should move the content forward.
    • Publishing the wrong version: Multiple drafts create confusion.
    • No publishing package: Publishers have to chase metadata, images, and links.
    • SEO added after publication: Important optimization becomes an afterthought.
    • Images arrive too late: Pages are delayed or launched with temporary assets.
    • No internal-link plan: Content is published in isolation.
    • No incoming links: Older content is never updated to support new pages.
    • Skipping QA: Deadline pressure replaces final review.
    • Ignoring mobile: Desktop-only checks miss common presentation problems.
    • No live-page verification: Teams assume the CMS preview matches production.
    • Forgetting indexing: Important new URLs are published without a post-publish search check.
    • No distribution: Useful content is published but never promoted.
    • Too many approvals: Unnecessary handoffs create bottlenecks.
    • Blind automation: Rules execute without checking whether the outcome makes sense.

    How to Improve a Slow Content Publishing Workflow

    If content regularly waits days or weeks between approval and publication, map the workflow from beginning to end.

    Look for unnecessary friction.

    Start by:

    • assigning one owner per stage
    • defining what “approved” means
    • creating a standard publishing package
    • using reusable QA checklists
    • creating CMS templates where practical
    • removing duplicate approval steps
    • automating repetitive notifications
    • tracking where content waits the longest

    Do not assume every delay requires another tool.

    Sometimes the real problem is simply that nobody knows whether the editor, SEO specialist, or publisher is responsible for the next action.

    Final Thoughts on Content Publishing Workflows

    A good content publishing workflow does not stop at writing, approval, or even publication.

    It should connect strategy and execution all the way through:

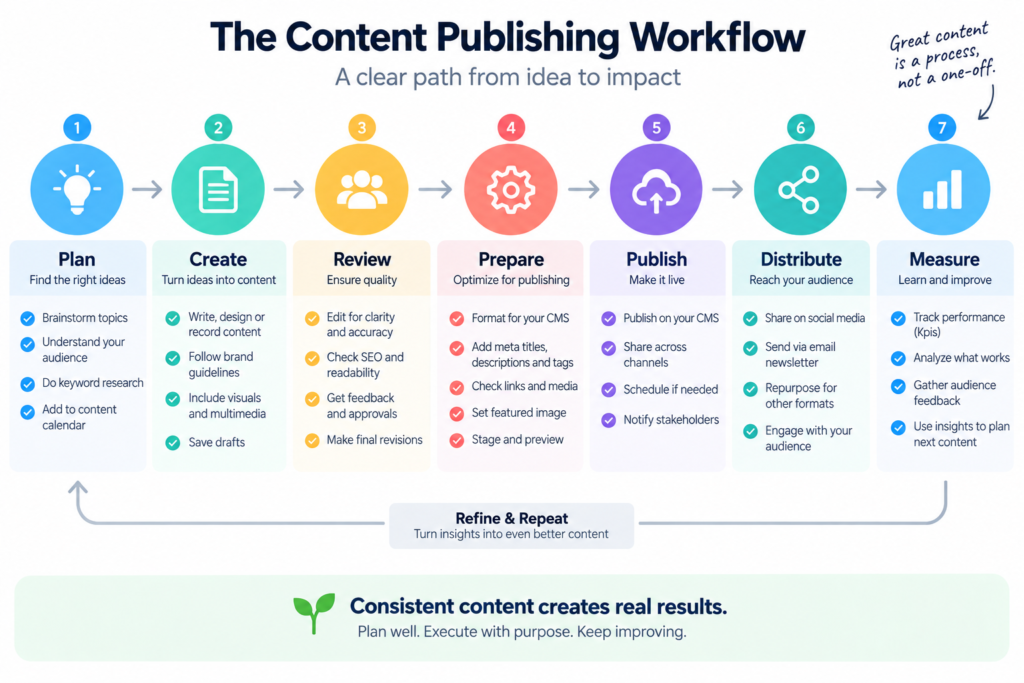
    Plan → Create → Review → Prepare → Implement → Optimize → QA → Publish → Verify → Distribute and Monitor

    The most effective workflows also include two frequently missed post-publish actions: adding incoming internal links from older relevant pages and checking that important new URLs are available for indexing.

    NextWebOps helps businesses and agencies handle the execution side of this process, including WordPress publishing, Shopify publishing, Webflow publishing, formatting, metadata, image optimization, internal linking, content migration, and publishing QA.

    Contact NextWebOps about your content publishing workflow.

    Frequently Asked Questions

    What is a content publishing workflow?

    A content publishing workflow is a structured process that moves content through planning, creation, review, CMS implementation, optimization, QA, publication, and post-publish activities.

    What are the stages of a content publishing workflow?

    A practical workflow can include planning, drafting, editorial review, publishing preparation, CMS implementation, SEO, media optimization, QA, publication, live verification, indexing, distribution, and monitoring.

    How do you create a content workflow?

    Document your existing process, identify every recurring task and handoff, assign owners, establish approval criteria, choose useful statuses, and create checklists for detailed implementation and QA.

    What is the difference between a content workflow and an editorial calendar?

    An editorial calendar mainly shows what content is planned and when it should be published. A workflow defines how each piece moves through the tasks, owners, approvals, implementation, and publishing process required to reach that date.

    Who should own content publishing?

    Ownership depends on the organization. A content manager or publisher often owns the final implementation stage, while writers, editors, SEO specialists, designers, and QA reviewers may own earlier or supporting tasks.

    What should happen before publishing content?

    The content should be editorially approved, implemented correctly in the CMS, optimized for search, checked for links and images, reviewed for accessibility, tested on mobile, and passed through a pre-publish QA checklist.

    What should happen after content is published?

    Review the live page, test links and CTAs, verify indexability, add relevant incoming internal links, confirm sitemap inclusion, request indexing where appropriate, distribute the content, and monitor performance.

    How can content publishing be automated?

    Automation can handle task assignment, reminders, status updates, scheduled publication, image compression, and some technical checks. Human review is still important for accuracy, context, visual quality, accessibility, and final live-page QA.

    What is a CMS publishing workflow?

    A CMS publishing workflow is the part of the overall process that controls how approved content is entered, formatted, reviewed, approved, and published through a content management system such as WordPress, Shopify, or Webflow.

    How do you improve a slow publishing process?

    Identify where content waits the longest, clarify ownership, standardize publishing packages, reduce unnecessary approvals, create reusable checklists, and automate repetitive tasks where doing so does not compromise quality.

  • Content QA Checklist: 25 Things to Check Before Publishing

    Content QA Checklist: 25 Things to Check Before Publishing

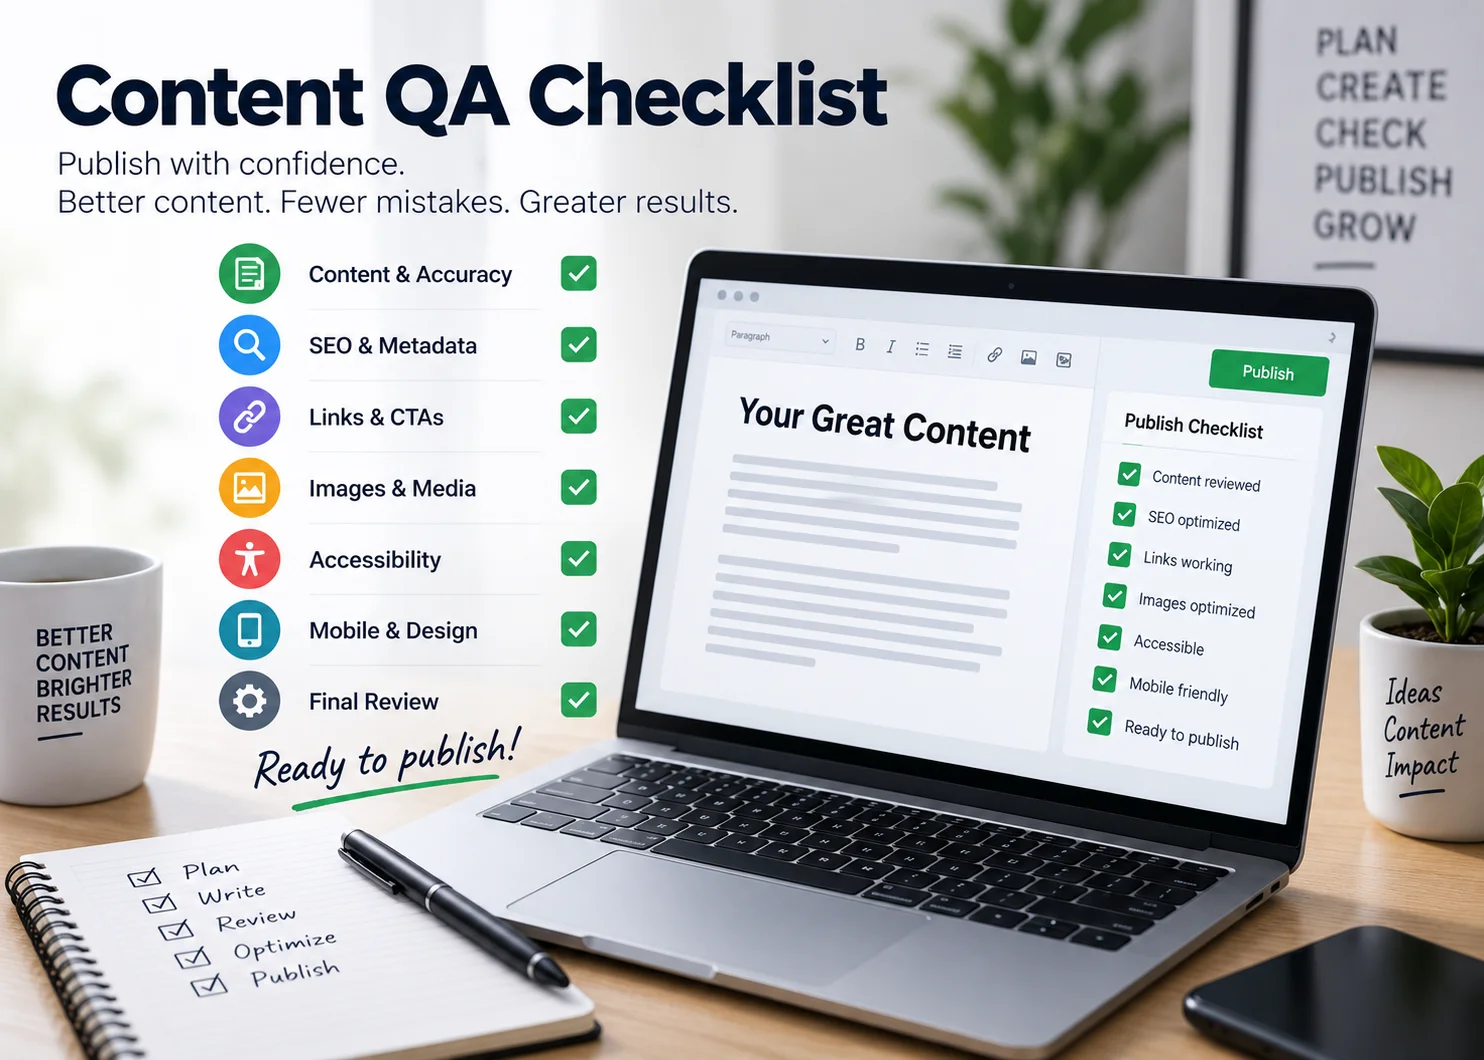
    A strong content QA checklist helps catch problems before they reach your audience.

    A page can be well written and still fail after publication because the metadata is missing, a link is broken, an image is oversized, a CTA points to the wrong destination, the mobile layout breaks, or a draft note is still sitting in the copy.

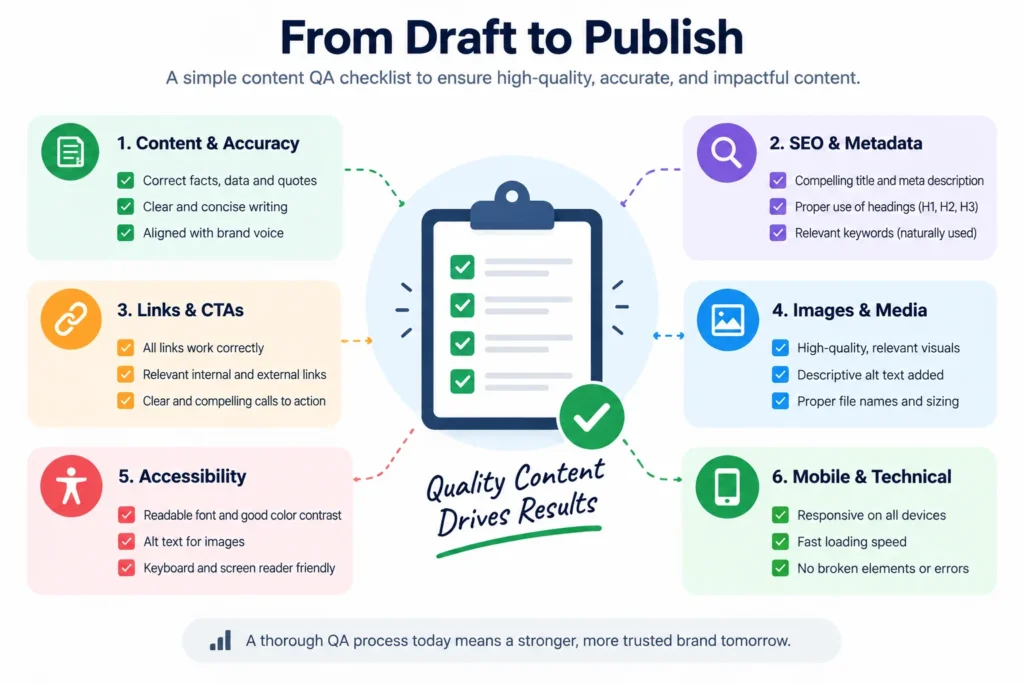
    Content quality assurance is the final layer between a finished draft and a reliable live page. It brings together editorial review, SEO checks, accessibility, formatting, links, media, CMS implementation, and live-page verification.

    This checklist is designed for blog posts, landing pages, product pages, collection pages, service pages, and other website content published through WordPress, Shopify, Webflow, or a similar CMS.

    What Is Content QA?

    Content QA, or content quality assurance, is a structured review process used to confirm that digital content is accurate, consistent, usable, accessible, optimized, and correctly implemented before it is considered complete.

    It is broader than proofreading.

    Proofreading focuses mainly on spelling, grammar, and language. Content QA also checks:

    • content accuracy
    • page structure
    • SEO metadata
    • internal and external links
    • images and alt text
    • accessibility
    • mobile presentation
    • CMS formatting
    • buttons and forms
    • the final live page

    Siteimprove’s content quality assurance framework similarly recommends defining quality standards, using a repeatable checklist, and assigning clear responsibility for review.

    Content QA Checklist Before Publishing

    Content Accuracy and Editorial QA

    1. Verify Facts, Dates, Names, and Claims

    Check every factual statement that could be wrong, outdated, or misrepresented.

    Review:

    • people and company names
    • dates
    • statistics
    • product details
    • technical information
    • pricing references
    • quotes
    • legal or compliance claims

    Use primary or authoritative sources whenever possible.

    A polished article with one incorrect number or outdated claim can damage trust more than a minor grammar error.

    2. Check Spelling, Grammar, and Punctuation

    Run an automated spelling and grammar check, but do not rely on tools alone.

    Read the final version manually for:

    • missing words
    • duplicated phrases
    • awkward sentences
    • incorrect punctuation
    • inconsistent spelling

    Manual review matters because automated tools often miss errors that are technically grammatical but wrong in context.

    3. Confirm Brand Voice and Terminology

    Check whether the page sounds like the rest of the site.

    Look for inconsistent:

    • capitalization
    • product terminology
    • service names
    • tone
    • abbreviations
    • US vs. Canadian or UK spelling conventions

    Consistency becomes especially important when content comes from multiple writers or AI-assisted workflows.

    4. Remove Placeholder Text and Draft Notes

    Before publishing, search for unfinished content such as:

    • Lorem ipsum
    • TODO
    • [insert link]
    • [add image]
    • editor comments
    • draft headings
    • internal notes

    This sounds basic, but placeholder content is a common publishing mistake when teams move quickly.

    Content Structure and Formatting QA

    5. Confirm One Clear H1

    The page should have one clear primary heading that matches its main topic.

    In WordPress, the post title normally serves as the H1, so avoid adding another H1 inside the article body.

    6. Check H2 and H3 Hierarchy

    Headings should reflect content structure rather than visual preference.

    A logical pattern looks like:

    H1 → H2 → H3

    Avoid unnecessary jumps such as:

    H2 → H4

    Also make sure headings accurately describe the section underneath them.

    7. Break Up Long Paragraphs

    Large blocks of text can make even useful content difficult to read, especially on mobile.

    Use:

    • shorter paragraphs
    • subheadings
    • bullet points
    • numbered steps
    • tables where appropriate

    Formatting should help the reader move through the content naturally.

    8. Check Lists, Tables, and Callouts

    Review every list and structured element after implementation.

    Make sure:

    • bullets render consistently
    • numbered steps remain in the correct order
    • tables fit on mobile screens
    • callout boxes do not break the layout
    • icons and labels align properly

    9. Review Bold, Italic, and Other Emphasis

    Formatting should improve readability, not create visual noise.

    Use emphasis sparingly for:

    • important terms
    • key takeaways
    • labels
    • short CTAs

    A page where every other sentence is bold becomes harder to scan.

    SEO QA

    10. Verify the Primary Keyword and Search Intent

    Compare the finished page with the original search intent.

    Ask:

    • Does the page still answer the intended query?
    • Did the article drift into a broader topic?
    • Is the primary keyword represented naturally?
    • Does the page type match what users expect?

    A technically optimized page can still underperform if it answers the wrong intent.

    11. Review the SEO Title

    Check that the SEO title:

    • accurately describes the page
    • includes the primary keyword naturally
    • is concise
    • is distinct from other site titles
    • encourages the right person to click

    Do not stuff multiple keyword variations into the title.

    12. Review the Meta Description

    The meta description should summarize the page clearly and include the main keyword where natural.

    Check for:

    • duplicate descriptions
    • generic wording
    • unfinished text
    • irrelevant CTAs

    It should make sense even when read without the rest of the page.

    13. Check the URL Slug

    The slug should be:

    • short
    • descriptive
    • easy to read
    • free from unnecessary dates or filler words

    Avoid changing established URLs casually after publication.

    14. Verify Heading Relevance

    Review the H2 and H3 structure from an SEO perspective.

    Headings should cover the major questions or subtopics a searcher expects while helping the reader move through the page.

    If the headings look optimized but the sections underneath are thin, expand the useful content rather than adding more keyword-heavy headings.

    15. Check Internal Links

    Internal links should support both navigation and site structure.

    Review whether the page includes links to relevant:

    • service pages
    • supporting guides
    • related articles
    • commercial pages

    Use descriptive anchor text and follow internal linking best practices.

    Also plan links into the new page from older relevant content. A newly published article should not sit with zero incoming internal links.

    Link and CTA QA

    16. Click Every Internal Link

    Do not assume a link works because the URL looks correct.

    Click it.

    Check for:

    • 404 errors
    • unnecessary redirects
    • wrong pages
    • staging domains
    • typos
    • incorrect anchor destinations

    If you publish on Shopify, also verify that links follow your intended Shopify internal linking structure.

    17. Test External Links

    External references should still work and support the claim they are attached to.

    Prefer primary sources where possible.

    Check that the link:

    • opens the intended page
    • is still current
    • supports the surrounding statement
    • does not accidentally send users to an unrelated competitor page

    18. Test Every CTA

    CTAs are one of the most important elements to verify because they connect content to business outcomes.

    Check:

    • buttons
    • contact links
    • form links
    • email links
    • phone links
    • download links

    Make sure the anchor text matches the destination.

    If the page is intended to generate inquiries, verify the full path to the contact page rather than assuming the CTA works.

    Image and Media QA

    19. Check Image File Size and Format

    Images should be large enough to look sharp but not so large that they add unnecessary page weight.

    Review:

    • dimensions
    • compression
    • file format
    • visual quality
    • mobile rendering

    Where appropriate, use modern formats such as WebP.

    For the broader process, see the NextWebOps guide to image SEO.

    20. Verify Image Alt Text

    Meaningful images should have descriptive alt text that explains what the image contains without keyword stuffing.

    Avoid:

    • blank alt text on important images
    • generic descriptions
    • duplicating the same alt text everywhere
    • using filenames as alt text

    Decorative images may appropriately use empty alt text depending on context.

    21. Check Image Placement

    Images should support the section where they appear.

    Make sure:

    • the image is near the related text
    • it does not interrupt the reading flow
    • captions are used when necessary
    • the image is not stretched or cropped badly

    22. Confirm Media Credits or Captions Where Needed

    If an image, chart, or media asset requires attribution, verify that the credit is accurate and visible.

    Do not add unnecessary captions to decorative images simply because a caption field exists.

    Accessibility QA

    23. Review Alt Text and Decorative Images

    Accessibility QA should confirm that useful images have meaningful descriptions and purely decorative visuals do not create unnecessary noise for screen-reader users.

    The State of Colorado’s accessible online content checklist provides a useful reference for reviewing web content accessibility.

    24. Check Link Text

    Link text should explain where the link goes.

    Avoid vague anchors such as:

    • click here
    • read more
    • this page

    when a more descriptive option is available.

    25. Review Readability, Contrast, and Mobile Presentation

    Check whether users can comfortably read and interact with the page.

    Review:

    • font size
    • text contrast
    • button contrast
    • spacing
    • line length
    • mobile layout
    • overlapping elements

    A page that looks fine in the CMS editor may still render poorly on a phone.

    Live-Page QA After Publishing

    Publishing is not the end of the QA process.

    The live page should always be checked because previews do not perfectly reproduce the final environment.

    After publishing, review:

    • page title
    • heading hierarchy
    • paragraph spacing
    • images
    • internal links
    • external links
    • buttons
    • forms
    • mobile layout
    • SEO title and meta description
    • canonical URL
    • schema where relevant
    • indexability

    Also confirm that no staging or noindex settings carried over accidentally.

    If your team has content ready but needs reliable implementation and final verification, get help with content publishing QA.

    Content QA Checklist for WordPress, Shopify, and Webflow

    WordPress Content QA

    For WordPress posts and pages, verify:

    • post title and H1 behavior
    • category
    • tags
    • featured image
    • SEO plugin fields
    • internal links
    • image alt text
    • front-end formatting

    If using Rank Math, confirm the focus keyword, SEO title, slug, meta description, schema type, and category are all correct before publishing.

    Shopify Content QA

    For Shopify, review:

    • product or collection content
    • blog formatting
    • product media
    • SEO listing fields
    • internal links
    • variants
    • buttons
    • live storefront presentation

    Always test the actual customer-facing page.

    Webflow Content QA

    For Webflow CMS content, verify:

    • CMS fields
    • meta title
    • meta description
    • image alt text
    • collection template rendering
    • responsive behavior
    • links
    • buttons and forms

    Template-driven websites require extra care because one CMS field can affect multiple pages.

    Content QA Checklist Template

    Use this simplified structure for a repeatable review process.

    Check Status Notes Owner
    Facts and claims verified Pending / Done Source notes Editor
    Spelling and grammar reviewed Pending / Done Corrections Editor
    SEO title and meta checked Pending / Done Keyword / length SEO
    Internal links tested Pending / Done Fixes needed Publisher
    External links tested Pending / Done Source validation Publisher
    Images optimized Pending / Done Size / format Publisher
    Alt text reviewed Pending / Done Accessibility Publisher
    Mobile layout checked Pending / Done Issues QA
    Live page reviewed Pending / Done Final fixes QA

    A checklist does not need to be complicated. It needs to be consistent enough that important checks are not skipped when deadlines are tight.

    Common Content QA Mistakes

    • Relying only on spellcheck: Content QA includes implementation, SEO, links, and usability.
    • Checking only the draft: The live page can introduce new problems.
    • Ignoring mobile: Desktop preview alone is not enough.
    • Forgetting incoming internal links: New pages need links from older relevant content.
    • Publishing incorrect metadata: Draft titles and descriptions often survive into production.
    • Skipping CTA testing: A broken inquiry path directly affects conversions.
    • Uploading oversized images: Image quality should not come at the cost of unnecessary page weight.
    • Using duplicated alt text: Different meaningful images should be described accurately.
    • Leaving placeholder content: Draft notes are easy to miss during rushed launches.
    • Linking to staging URLs: Always check the domain in final internal links.
    • Skipping source verification: Outdated facts reduce trust.
    • Assuming preview equals production: Always verify the live page.

    How to Build a Repeatable Content QA Workflow

    Content QA workflow from draft review to live publishing and indexing

    A reliable publishing process can follow this sequence:

    Draft → Editorial QA → SEO QA → CMS Implementation → Pre-Publish QA → Publish → Live QA → Indexing

    Draft

    Complete the copy and gather approved media.

    Editorial QA

    Check facts, spelling, grammar, tone, and structure.

    SEO QA

    Review search intent, title, meta description, headings, URL, and internal links.

    CMS Implementation

    Add the content to WordPress, Shopify, Webflow, or the target CMS with correct formatting.

    Pre-Publish QA

    Test links, images, CTAs, mobile preview, accessibility, and CMS fields.

    Publish

    Make the page live.

    Live QA

    Check the actual URL in desktop and mobile layouts.

    Indexing

    Confirm the URL is indexable, included in the sitemap where appropriate, and available for submission through Google Search Console.

    When to Use a Content QA Checklist

    A structured checklist is useful for almost any web publishing task, including:

    • blog posts
    • landing pages
    • service pages
    • Shopify products
    • Shopify collections
    • WordPress posts
    • Webflow CMS pages
    • content migrations
    • website redesigns
    • large content imports

    The more content a team publishes, the more valuable a repeatable QA process becomes.

    Final Thoughts on Content QA

    Content QA is not just proofreading before someone presses Publish.

    It is the final operational layer that makes sure the page is accurate, optimized, usable, accessible, functional, and correctly implemented.

    The strongest process checks both the CMS and the live page.

    That means reviewing copy, SEO, links, images, accessibility, formatting, mobile behavior, CTAs, and indexing as part of one repeatable workflow.

    NextWebOps helps businesses and agencies with content implementation, WordPress publishing, Shopify publishing, Webflow publishing, metadata, image optimization, internal linking, content migration, and final publishing QA.

    Contact NextWebOps about your content publishing process.

    Frequently Asked Questions

    What is a content QA checklist?

    A content QA checklist is a repeatable list of checks used to review content accuracy, structure, SEO, links, images, accessibility, formatting, functionality, and live-page implementation before content is considered complete.

    What does content QA mean?

    Content QA means content quality assurance. It is the process of reviewing both the content itself and how it has been implemented on the website.

    What should be checked before publishing content?

    Check facts, grammar, headings, metadata, URL, links, images, alt text, formatting, CTAs, accessibility, mobile presentation, and CMS settings before publishing.

    How is content QA different from proofreading?

    Proofreading mainly checks language. Content QA also reviews SEO, functionality, links, images, accessibility, CMS implementation, and the live page.

    What should an SEO QA checklist include?

    An SEO QA checklist should include search intent, primary keyword use, SEO title, meta description, URL, headings, internal links, image optimization, indexability, canonical tags, and structured data where relevant.

    Should content QA happen before or after publishing?

    Both. Pre-publish QA catches problems before launch, while live-page QA verifies that the final page renders and functions correctly in production.

    How do you QA website content?

    Review the copy, SEO fields, links, images, accessibility, responsive layout, buttons, forms, CMS fields, and the final live page using a standardized checklist.

    What should be checked after publishing a blog post?

    Check the live URL, headings, spacing, images, links, CTAs, mobile layout, metadata, indexability, sitemap inclusion, and any planned incoming internal links.

    Who should own content QA?

    Ownership depends on the team. Editorial, SEO, publishing, and QA responsibilities can be split across different people, but one person should be responsible for confirming the final checklist is complete.

    Can content QA be automated?

    Some checks can be automated, such as spelling, broken-link detection, metadata validation, and accessibility scanning. Manual review is still needed for factual accuracy, brand voice, context, layout quality, and conversion paths.

  • Shopify Product Description SEO: How to Write Better Product Copy

    Shopify Product Description SEO: How to Write Better Product Copy

    Shopify product description SEO is about writing product copy that helps search engines understand what you sell while giving shoppers the information they need to decide whether a product is right for them.

    That sounds simple, but many Shopify stores still rely on copied supplier descriptions, vague marketing language, keyword-heavy paragraphs, or thin product copy that says very little about the actual item.

    A stronger product description does three jobs at once: it matches product-level search intent, communicates useful benefits and specifications, and supports the rest of the product page with clear, scannable content.

    This guide explains how to write better Shopify product descriptions, how to structure them for search and conversions, how to avoid duplicate content, and how to implement them consistently across a growing catalog.

    What Is Shopify Product Description SEO?

    Shopify product description SEO is the optimization of the main product copy that appears on an individual product page.

    The goal is not to turn every description into an essay. It is to give shoppers and search engines a clear understanding of:

    • what the product is
    • who it is for
    • what makes it useful
    • which features matter
    • what specifications affect the buying decision
    • how the product fits into the rest of your catalog

    A product description is only one part of a complete Shopify product page SEO strategy. Titles, metadata, URLs, images, internal links, structured data, reviews, and page usability all contribute to the overall page.

    Shopify’s own SEO product description guidance emphasizes writing for shoppers first and using product copy to help search engines understand what the item is and who it is for.

    How to Write SEO-Friendly Shopify Product Descriptions

    1. Start With the Right Product-Level Keyword

    The description should support a keyword that actually fits an individual product page.

    Broad category terms often belong on collection pages.

    For example:

    Too broad for one product:

    women's shoes

    More appropriate for a specific product:

    women's waterproof trail running shoes

    The second phrase describes a much more specific product intent.

    If a keyword represents a category where shoppers expect multiple options, target it through your Shopify collection page SEO strategy instead of forcing it onto one SKU.

    2. Write for Shoppers First

    Product descriptions should answer real buying questions before they worry about search engines.

    A useful description should make it easy to understand:

    • what the product does
    • who should buy it
    • what problem it solves
    • what makes it different
    • what details matter before purchase

    Compare these two examples.

    Weak:

    High-quality premium waterproof running shoe made with the best materials for excellent performance.

    Better:

    Built for wet and technical trails, this waterproof running shoe combines a sealed upper, high-grip outsole, and cushioned midsole to help runners stay comfortable and stable across uneven terrain.

    The second version explains the product rather than simply praising it.

    3. Lead With the Main Benefit Above the Fold

    The opening section of the product description should quickly communicate the product’s main value.

    For many products, that means a short introductory paragraph containing:

    • the product type
    • the main use case
    • the primary benefit
    • one meaningful differentiator

    You do not need to force a fixed word count into this section. The goal is to give mobile and desktop shoppers useful information without making them scroll through a long introduction before they understand the product.

    For example:

    The XR200 women’s waterproof trail running shoe is designed for wet, uneven terrain. A breathable waterproof upper helps keep feet dry, while the lugged outsole provides grip on rocky and muddy surfaces.

    That opening is specific, useful, and naturally includes relevant product terminology.

    4. Turn Features Into Customer Benefits

    Specifications matter, but shoppers also need to understand why those specifications are useful.

    For example:

    Feature:

    Waterproof membrane

    Benefit-focused version:

    Waterproof membrane helps keep feet dry during wet-weather runs.

    Another example:

    Feature:

    600D recycled polyester

    Benefit-focused version:

    Durable 600D recycled polyester provides everyday abrasion resistance while using recycled material.

    Do not remove technical specifications. Explain them in a way that makes their value clear.

    5. Add Useful Details Below the Fold

    After the opening value proposition, provide the deeper information a shopper may need before purchasing.

    Depending on the product, that can include:

    • materials
    • dimensions
    • weight
    • sizing
    • fit
    • compatibility
    • care instructions
    • warranty information
    • included accessories
    • technical specifications

    For a simple ceramic mug, the description may remain short.

    For a technical backpack, laptop dock, running shoe, appliance, or expensive piece of furniture, shoppers may need much more detail.

    Useful depth should determine length, not an arbitrary SEO target.

    6. Use Keywords and Related Terms Naturally

    A good product description usually includes the primary product term naturally because that term accurately describes the item.

    Related language may also appear naturally through:

    • materials
    • use cases
    • features
    • sizes
    • product category
    • customer needs

    For a waterproof trail running shoe, natural supporting terms might include:

    • trail grip
    • waterproof upper
    • technical terrain
    • cushioned midsole
    • running outsole

    There is no useful reason to repeat the exact primary keyword in every paragraph.

    Do not optimize toward a keyword-density percentage. Write clear product copy and make sure important terminology appears where it genuinely belongs.

    7. Format Product Descriptions for Easy Scanning

    Even strong copy can underperform if it is difficult to read.

    Use formatting that helps shoppers scan the page quickly:

    • short paragraphs
    • clear subheadings
    • bullet points
    • specification lists
    • short labeled sections

    A long wall of text is especially difficult on mobile.

    For a detailed product, the structure might look like:

    Overview

    Short benefit-led introduction.

    Key Features

    • feature + benefit
    • feature + benefit
    • feature + benefit

    Specifications

    • material
    • dimensions
    • weight

    Care or Sizing

    Additional purchase information.

    If you already have product content but need it formatted and implemented consistently across a store, get help with Shopify product content publishing.

    8. Write Unique Copy Instead of Reusing Supplier Descriptions

    Supplier and manufacturer descriptions are convenient, but they are often reused by many retailers.

    Publishing the exact same paragraph as dozens of competing stores gives customers very little reason to prefer your page and limits your opportunity to add useful, brand-specific information.

    Instead, improve the copy with:

    • clearer benefits
    • buyer-specific use cases
    • original formatting
    • accurate specifications
    • real questions customers ask
    • details about fit, installation, compatibility, or care

    Do not rewrite simply for the sake of making the wording different.

    The goal is to make the description more helpful.

    9. Add Relevant Internal Links

    Product descriptions can sometimes provide useful opportunities for contextual internal links.

    Relevant destinations might include:

    • the parent collection
    • a related collection
    • a sizing guide
    • a care guide
    • a compatibility page
    • a relevant educational article

    For example, a waterproof hiking boot description could link to a guide explaining how to choose hiking boot sizing if that resource genuinely helps the buyer.

    Do not insert links merely to increase link count.

    Use your broader Shopify internal linking strategy to connect products, collections, and informational content in both directions.

    10. Complete a Final Product Description QA

    Product copy should be checked on the live storefront after publishing.

    Review:

    • factual accuracy
    • spelling and grammar
    • product variant accuracy
    • formatting
    • keyword use
    • duplicate copy
    • internal links
    • mobile layout
    • spacing
    • buttons and expandable sections

    Check whether important text has been accidentally hidden behind tabs or collapsed elements and whether the description remains readable on a small screen.

    For catalogs with hundreds of products, this QA step matters because one template or publishing mistake can affect many pages at once.

    How Long Should a Shopify Product Description Be?

    There is no universal ideal product description length.

    The SERP for this topic often includes recommendations such as 300 to 500 words, but that should not become a rule for every product.

    A simple item may only require a concise paragraph and a few specifications.

    A more complex product may need significantly more content to cover:

    • features
    • benefits
    • dimensions
    • compatibility
    • sizing
    • technical details
    • care
    • installation

    Adding 400 words of filler to a simple product does not make the page better optimized.

    The better question is:

    Does the description give the customer enough information to understand and evaluate the product?

    Shopify Product Description SEO Example

    Shopify product description SEO example comparing weak and optimized ecommerce product copy

    Consider a fictional product:

    XR200 Women’s Waterproof Trail Running Shoe

    Weak Product Description

    High-quality waterproof trail running shoe. Comfortable and durable. Great for running and hiking. Buy now.

    This description is short, but the main problem is not its length.

    It is vague.

    It does not explain the terrain, fit, materials, grip, cushioning, waterproofing system, or intended user.

    Better Product Description

    The XR200 women’s waterproof trail running shoe is built for runners who need reliable grip and weather protection on wet, uneven trails. Its breathable waterproof upper helps keep moisture out while allowing heat to escape, and the lugged rubber outsole provides traction on mud, gravel, and rocky surfaces.

    Key benefits:

    • Waterproof upper helps keep feet dry in wet conditions.
    • Deep outsole lugs improve traction on loose and technical terrain.
    • Cushioned midsole helps absorb impact over longer trail runs.
    • Reinforced toe provides additional protection from rocks and debris.

    Specifications:

    • Upper: breathable waterproof synthetic mesh
    • Outsole: high-grip rubber
    • Midsole: cushioned EVA foam
    • Use: trail running and light hiking
    • Fit: standard women’s fit

    Need another option? Explore the women’s trail running shoes collection for additional styles and terrain types.

    The improved version gives search engines more product context because it gives the shopper more useful product information.

    Shopify Product Description SEO Template

    Use this framework as a starting point for new Shopify product descriptions.

    Product Name

    [Product or model name] + [useful product type or differentiator]

    Opening Value Proposition

    Write one short paragraph that explains:

    • what the product is
    • who it is for
    • the main use case
    • the main benefit

    Key Benefits

    • Benefit one
    • Benefit two
    • Benefit three

    Features

    • Feature + why it matters
    • Feature + why it matters
    • Feature + why it matters

    Specifications

    • Material
    • Dimensions
    • Weight
    • Compatibility
    • Included items

    Additional Information

    Add only what applies:

    • sizing
    • care
    • warranty
    • installation
    • shipping considerations
    • compatibility guidance

    Internal Links

    Add links only when useful, such as:

    • parent collection
    • related category
    • size guide
    • care guide

    Product Description vs Meta Description

    These are different fields with different jobs.

    Product Description

    The product description appears on the product page and can contain detailed information about the item.

    It helps:

    • explain the product
    • answer buying questions
    • support search relevance
    • improve conversion

    Meta Description

    The meta description is a short summary used as an input for search-result snippets.

    Shopify’s SEO keyword and metadata guidance explains how merchants can edit page titles and meta descriptions within Shopify.

    The meta description should summarize the page concisely rather than duplicate the entire product description.

    For example:

    Product description:

    Detailed content about waterproofing, grip, cushioning, sizing, materials, and use.

    Meta description:

    Shop XR200 women’s waterproof trail running shoes with high-grip outsoles, cushioned midsoles, and weather-ready comfort for wet trails.

    Product Description vs Product Title

    The product title identifies the item.

    The description explains it.

    A title might be:

    XR200 Women’s Waterproof Trail Running Shoes

    The description then expands on:

    • terrain
    • weather protection
    • grip
    • comfort
    • fit
    • materials

    Do not try to squeeze every feature and search term into the title.

    Common Shopify Product Description SEO Mistakes

    • Copying supplier descriptions: Reused manufacturer copy adds little differentiation.
    • Using vague marketing language: Claims such as “premium quality” mean little without specifics.
    • Keyword stuffing: Repeating product terms unnaturally hurts readability.
    • Listing features without benefits: Explain why features matter.
    • Ignoring buyer-specific details: Include sizing, compatibility, care, or dimensions when relevant.
    • Using identical copy across variants: Distinguish meaningful differences where the products genuinely differ.
    • Publishing long walls of text: Use headings, paragraphs, and lists.
    • Adding no relevant internal links: Useful supporting pages can improve navigation.
    • Forcing a fixed word count: Product complexity should determine content depth.
    • Skipping mobile QA: Always inspect the live product page on smaller screens.
    • Confusing product descriptions with meta descriptions: They serve different purposes.

    Shopify Product Description SEO Checklist

    • Choose a product-level keyword that matches search intent.
    • Write original product copy.
    • Lead with the primary customer benefit.
    • Explain important features.
    • Add relevant specifications.
    • Use keywords naturally.
    • Format the copy for easy scanning.
    • Add internal links where useful.
    • Verify all product facts.
    • Review mobile presentation.
    • Check the live storefront after publishing.

    Need help reviewing descriptions, metadata, links, formatting, and catalog consistency? Discuss your Shopify product publishing workflow with NextWebOps.

    How Product Descriptions Fit Into Shopify Product Page SEO

    A strong product description cannot compensate for a weak product page by itself.

    Product copy should work together with:

    • the product title
    • SEO title and meta description
    • clean URL structure
    • product images
    • image alt text
    • internal links
    • structured data
    • reviews
    • mobile usability
    • page speed

    For product imagery specifically, use accurate, descriptive Shopify image alt text rather than treating alt fields as keyword lists.

    When all of these elements work together, the page becomes easier for search engines to interpret and easier for shoppers to evaluate.

    Final Thoughts on Shopify Product Description SEO

    Good Shopify product descriptions are not written for algorithms first.

    They are written to help shoppers understand the product, compare it with alternatives, and make a confident decision.

    The SEO value comes from accurate product language, useful detail, clear structure, original copy, natural keyword use, and strong connections to the rest of the store.

    For small catalogs, that can be handled product by product. For stores with hundreds or thousands of SKUs, product descriptions become a content operations challenge involving templates, formatting, consistency, internal linking, metadata, and QA.

    NextWebOps helps ecommerce businesses and agencies implement Shopify product descriptions, metadata, images, internal links, formatting, and publishing QA across growing catalogs.

    Contact NextWebOps about your Shopify product content.

    Frequently Asked Questions

    How long should a Shopify product description be?

    There is no fixed ideal length. Simple products may need only concise copy and a few specifications, while complex or expensive products may require significantly more detail. Write enough to answer important buyer questions without adding filler for SEO.

    Do Shopify product descriptions help SEO?

    Yes. Product descriptions provide search engines with useful context about what the product is, what features it has, and which searches it may be relevant to. Their main purpose should still be helping shoppers understand the product.

    How do I write an SEO-friendly Shopify product description?

    Choose the right product-level search intent, write original shopper-focused copy, explain benefits and specifications, use relevant terminology naturally, format the page clearly, and complete a live-page QA check after publishing.

    Should every Shopify product have a unique description?

    Important products should have content that accurately reflects their own features and use cases. Similar products may naturally share some terminology, but copying the exact same description across many different SKUs can make the catalog less useful.

    Can I use manufacturer descriptions on Shopify?

    You can use accurate manufacturer information as a source, but publishing the exact supplier copy often misses opportunities to add buyer-specific benefits, use cases, formatting, internal links, and your own brand context.

    How many keywords should I use in a product description?

    There is no ideal keyword count. Use the main product term and relevant supporting language where they naturally describe the product. Avoid repeating phrases solely to increase frequency.

    What is the difference between a product description and a meta description?

    The product description appears on the actual product page and can provide detailed information. The meta description is a short summary intended for search-result snippets and should concisely describe the page.

    Should Shopify product descriptions include internal links?

    They can when the links genuinely help the shopper. Useful destinations might include a parent collection, sizing guide, care guide, compatible product, or related educational resource.

    What should I include in a Shopify product description?

    Include the product’s main benefit, important features, specifications, materials, use cases, sizing or compatibility information, care instructions, and other details that help the customer evaluate the item.

    Can AI write Shopify product descriptions?

    AI can help generate drafts and speed up large catalog workflows, but the output should be reviewed for factual accuracy, repetitive language, unsupported claims, incorrect specifications, keyword stuffing, and brand consistency before publishing.

  • Shopify Internal Linking: 12 Ways to Improve SEO and Navigation

    Shopify Internal Linking: 12 Ways to Improve SEO and Navigation

    Shopify internal linking is the process of connecting pages within your own store so shoppers and search engines can move naturally between related content.

    Done well, internal links help users discover products, collections, guides, and supporting information without getting lost. They also help search engines understand how your store is structured and which pages are most important.

    The problem is that many Shopify stores grow without a deliberate linking system. New blog posts are published with no incoming links. Collection pages sit several clicks deep. Product pages become dead ends. Old links point to redirected or outdated URLs.

    This guide explains how to build a practical Shopify internal linking strategy across blog posts, collections, products, navigation, breadcrumbs, and supporting pages.

    What Is Shopify Internal Linking?

    Internal linking means linking one page on your Shopify store to another page on the same domain.

    Examples include:

    • a blog post linking to a collection
    • a blog post linking to a product
    • a collection linking to a related collection
    • a product linking back to its parent collection
    • a navigation menu linking to major categories
    • a breadcrumb trail linking back through the store hierarchy

    Shopify’s current internal linking SEO guidance emphasizes site structure, contextual links, and helping search engines understand page importance.

    For a broader foundation on link planning, see the NextWebOps guide to internal linking best practices.

    Why Internal Linking Matters for Shopify SEO

    It Helps Search Engines Discover Pages

    Search engines find pages by following links.

    If a new product, collection, or article has no internal links pointing to it, that page is harder to discover and may function like an orphan page.

    This is especially important when publishing new content. A new article should not only contain links to older pages. Older relevant pages should also be updated to link back to the new article.

    It Helps Search Engines Understand Site Structure

    Internal links help communicate relationships between page types.

    A simple ecommerce hierarchy might look like this:

    Homepage → Collection → Product

    Content can support that commercial structure:

    Blog Post → Collection → Product

    That pattern helps make the store easier to navigate while showing which pages belong together.

    It Supports Important Commercial Pages

    Some pages matter more than others.

    A high-value collection or evergreen product category may deserve more internal support than a temporary page or low-priority SKU.

    Relevant links from blog posts, category pages, and navigation can help reinforce those strategically important pages.

    It Improves User Navigation

    Internal linking is not only about search engines.

    A shopper reading a buying guide should have an easy route to the relevant collection. A customer viewing a product may benefit from links to related products, sizing information, care instructions, or a parent category.

    Good internal links reduce friction and create a more useful browsing path.

    12 Shopify Internal Linking Best Practices

    1. Build a Clear Store Hierarchy

    Start with structure before adding individual links.

    A simple hierarchy might be:

    Home → Women’s Shoes → Trail Running Shoes → Specific Product

    The goal is to keep important pages easy to reach without forcing users through unnecessary layers.

    A complicated hierarchy can bury important categories and make both navigation and crawling less efficient.

    2. Link Blog Posts to Relevant Collections

    Blog content often attracts informational traffic, while collection pages serve stronger commercial intent.

    That makes blog-to-collection linking one of the most useful internal linking patterns in ecommerce.

    For example:

    Blog post: How to Choose Trail Running Shoes

    Internal link: Women’s Trail Running Shoes collection

    This gives the reader a natural next step after learning what to look for.

    Your Shopify blog SEO strategy should therefore include relevant links toward collections and products instead of treating informational content as an isolated traffic channel.

    3. Link Blog Posts to Relevant Products

    Direct blog-to-product links can work well when the product genuinely fits the context.

    For example, an article about caring for leather boots could link to an appropriate cleaning kit or waterproofing product.

    The key is relevance.

    Do not force product links into every paragraph just because a product exists. The link should help the reader move from information to a useful commercial option.

    4. Link Collection Pages to Related Collections

    Collections should not always operate as isolated category pages.

    Related collection links can help shoppers explore nearby categories.

    For example:

    • Women’s Running Shoes
    • Trail Running Shoes
    • Road Running Shoes
    • Waterproof Running Shoes

    A logical relationship between these pages can improve both product discovery and site structure.

    This works especially well when implemented as part of your Shopify collection page SEO strategy.

    5. Link Product Pages Back to Useful Collections

    Product pages should not become dead ends.

    Useful internal links from a product page might point to:

    • the parent collection
    • a related collection
    • compatible products
    • a sizing guide
    • a care guide
    • a relevant buying guide

    This helps customers continue browsing even if the current product is not the right fit.

    It also supports a stronger Shopify product page SEO structure by connecting individual products to the broader categories and content around them.

    6. Use Descriptive Anchor Text

    Anchor text is the clickable wording of a link.

    Descriptive anchor text gives users and search engines more context than generic phrases.

    Weak:

    click here

    Better:

    women's waterproof trail running shoes

    That does not mean every link should use the exact same keyword.

    Natural variation is healthier and reads better.

    For example, links to the same collection might use:

    • women’s trail running shoes
    • waterproof trail shoes
    • our trail running collection

    Choose wording based on the sentence, not on a rigid anchor formula.

    7. Link to Canonical URLs

    Internal links should point to the preferred version of a page whenever possible.

    Shopify’s internal linking guidance specifically recommends linking to canonical URLs.

    Avoid pointing internal links to:

    • parameterized URLs
    • filtered URLs that should not be treated as primary pages
    • tracking URLs
    • duplicate paths
    • redirected URLs

    If your preferred collection URL is:

    /collections/trail-running-shoes

    link directly to that version instead of a longer filtered or tracked variation unless there is a specific user reason to do otherwise.

    8. Prioritize Important Commercial Pages

    Not every URL deserves equal internal-link attention.

    Prioritize pages that matter to the business, such as:

    • strategic collection pages
    • high-value product categories
    • evergreen buying guides
    • important service or support pages
    • priority products where appropriate

    This should still be done naturally.

    Linking every article to the same category, regardless of context, creates a poor user experience and weakens the usefulness of your internal linking system.

    9. Add Incoming Links to Every Important New Page

    This is one of the most commonly missed steps in content publishing.

    When a new article is published, most teams only think about the links inside that article.

    That is only half the job.

    After publishing, identify older relevant pages and add internal links into the new content.

    For example, after publishing a new guide about Shopify internal linking, older posts about:

    • Shopify blog SEO
    • collection page SEO
    • product page SEO
    • on-page SEO

    can be reviewed for natural opportunities to link back to it.

    This prevents strong new articles from sitting with zero inbound links.

    10. Use Breadcrumbs Where Appropriate

    Breadcrumbs give users a visible path back through the store hierarchy.

    For example:

    Home → Women’s Shoes → Trail Running Shoes → Product

    This can improve navigation and reinforce page relationships.

    Breadcrumb implementation depends on the Shopify theme, so verify the actual front-end behavior rather than assuming every theme handles breadcrumbs the same way.

    11. Fix Orphan Pages and Broken Internal Links

    An orphan page has no meaningful internal links pointing to it.

    Common Shopify examples include:

    • old blog posts
    • new collections
    • recently launched products
    • landing pages no longer in navigation

    Broken internal links can also appear when:

    • products are deleted
    • collection handles change
    • blog URLs change
    • pages are consolidated
    • old links point through redirects

    A good audit should look for both missing inbound links and outdated destinations.

    If your store has a large catalog with inconsistent linking, get help with Shopify internal linking implementation.

    12. Audit Internal Links Regularly

    Internal linking is not a one-time project.

    Stores change constantly as new products, collections, articles, and campaigns are published.

    Regular reviews should check:

    • which pages have few or no incoming links
    • broken internal links
    • redirected internal links
    • anchor text quality
    • deep pages
    • links to noncanonical URLs
    • outdated navigation paths
    • older articles that should link to newer content

    This ongoing maintenance is especially important for stores publishing content frequently.

    Shopify Internal Linking Examples

    Shopify internal linking example from blog content to collections and product pages

    Blog Post to Collection

    Page: How to Choose Hiking Boots

    Link: Hiking Boots Collection

    This gives an informational visitor a logical path toward shopping.

    Blog Post to Product

    Page: How to Clean Leather Boots

    Link: Leather Boot Care Kit

    The product is relevant because it solves the problem discussed in the article.

    Collection to Product

    Page: Men’s Running Shoes

    Links: Individual shoe models

    This is a standard commercial path and should remain easy to navigate.

    Product to Collection

    Page: XR200 Trail Running Shoe

    Link: Trail Running Shoes Collection

    This helps a shopper explore alternatives.

    Collection to Related Collection

    Page: Women’s Shoes

    Link: Women’s Hiking Boots

    This can be useful when the category relationship is clear.

    How Many Internal Links Should a Shopify Page Have?

    There is no universal number that every Shopify page should follow.

    The right amount depends on:

    • page length
    • page type
    • search intent
    • available relevant destinations
    • store structure

    A short product description may only need a few useful internal links. A long buying guide may naturally support several more.

    For blog content, a handful of highly relevant links is usually more useful than forcing dozens of unrelated destinations into the copy.

    Do not add internal links just to reach a quota.

    Every link should answer a simple question:

    Would this destination genuinely help the reader at this point?

    Shopify Internal Linking for Blogs, Collections, and Products

    Blog Posts

    Blog posts can link to:

    • related articles
    • relevant collections
    • specific products
    • buying guides
    • supporting informational pages

    They are often one of the best sources of contextual links because the anchor text can appear naturally within useful content.

    Collection Pages

    Collection pages can link to:

    • child collections
    • parent collections
    • related categories
    • buying guides
    • featured products

    These links should help category discovery rather than simply adding more SEO text.

    Product Pages

    Product pages can link to:

    • parent collections
    • compatible products
    • related products
    • sizing guides
    • care guides
    • relevant educational content

    A strong Shopify architecture connects these page types together rather than optimizing each one in isolation.

    Should You Use a Shopify Internal Linking App?

    Internal linking apps can help at scale, especially when a store contains thousands of products and articles.

    Automation can be useful for:

    • finding linking opportunities
    • adding controlled keyword-based links
    • identifying pages with few internal links
    • reducing repetitive manual work

    But automated linking needs review.

    Poor rules can create:

    • irrelevant links
    • too many links
    • repetitive exact-match anchors
    • links to the wrong page type
    • links to filtered or noncanonical URLs

    For smaller stores, a manual strategy may provide more control. For larger catalogs, automation can work well when combined with clear rules and regular QA.

    Common Shopify Internal Linking Mistakes

    • Using generic anchor text: Phrases like “click here” provide little context.
    • Publishing new pages with no incoming links: New articles and collections should receive links from older relevant pages.
    • Overusing exact-match anchors: Natural variation is better for readability.
    • Linking only from blogs to products: Collections and related informational pages also need support.
    • Leaving important collections orphaned: Strategic categories should be accessible from meaningful paths.
    • Creating excessive click depth: Important pages should not be buried unnecessarily.
    • Linking to redirected URLs: Update links to the final destination.
    • Linking to parameter-heavy URLs: Prefer the intended canonical page when possible.
    • Ignoring broken links: Deleted or renamed products can create poor user experiences.
    • Stuffing footer links: Footer links should remain useful rather than becoming an SEO dumping ground.
    • Over-automating: Internal linking apps still require human review.

    Shopify Internal Linking Checklist

    • Keep the store hierarchy clear.
    • Link relevant blog posts to collections.
    • Link blog posts to products when useful.
    • Connect related collections.
    • Link products back to useful collections.
    • Use descriptive anchor text.
    • Link to canonical URLs.
    • Prioritize important commercial pages.
    • Add incoming links to new content.
    • Use breadcrumbs where appropriate.
    • Find and fix orphan pages.
    • Fix broken and redirected internal links.
    • Review internal linking regularly.

    Need help finding orphan pages, cleaning up outdated links, and connecting blogs, collections, and products? Discuss your Shopify internal linking workflow with NextWebOps.

    Final Thoughts on Shopify Internal Linking

    Strong Shopify internal linking is not about adding as many links as possible.

    It is about building useful connections between pages so customers can move naturally through the store and search engines can understand the relationship between blogs, collections, products, and supporting content.

    The most important habit is also one of the easiest to miss:

    Every important new page should receive incoming links from older relevant content.

    That simple step prevents newly published articles from becoming isolated and helps turn individual posts into a connected topic cluster.

    NextWebOps helps ecommerce businesses and agencies implement internal links, update older content, improve anchor text, connect Shopify page types, and complete publishing QA.

    Contact NextWebOps about your Shopify SEO structure.

    Frequently Asked Questions

    What is Shopify internal linking?

    Shopify internal linking is the practice of linking pages within the same Shopify store, such as blogs to collections, collections to products, products to related categories, and navigation to important pages.

    Does internal linking help Shopify SEO?

    Internal links can help search engines discover pages, understand site structure, and identify relationships between content. They also improve navigation when the links are relevant to users.

    How many internal links should a Shopify page have?

    There is no fixed ideal number. Add links where they genuinely help the visitor and support the page’s purpose. Long guides can naturally contain more internal links than short product pages.

    Should Shopify blog posts link to products?

    Yes, when the product is relevant to the topic. A product link should provide a useful next step rather than being inserted only for SEO.

    Should Shopify blog posts link to collections?

    Yes. Blog-to-collection linking is especially useful when an informational article helps a reader understand a category and the collection provides the next commercial step.

    What anchor text should I use for Shopify internal links?

    Use descriptive wording that explains the destination naturally. Avoid relying on generic phrases such as “click here” and avoid forcing the exact same keyword into every link.

    How do I find orphan pages in Shopify?

    Use a site crawler, SEO auditing tool, or structured manual review to identify pages with no meaningful incoming internal links. Compare published products, collections, and blog posts against the site’s actual linking structure.

    Should I use an internal linking app on Shopify?

    An app can be useful for large stores, but automated links need rules and quality control. Review relevance, anchor text, destination URLs, and overall link volume before relying on automation.

    Should internal links point to canonical URLs?

    Yes, whenever possible. Internal links should generally point directly to the preferred canonical version of a page instead of unnecessary filtered, tracked, duplicate, or redirected URLs.

    Do breadcrumbs help Shopify SEO?

    Breadcrumbs can improve navigation and reinforce the relationship between products, collections, and higher-level categories. Their value comes primarily from clearer site structure and usability rather than being a standalone ranking tactic.

  • Shopify Image Alt Text: How to Write and Add It Correctly

    Shopify Image Alt Text: How to Write and Add It Correctly

    Shopify image alt text is easy to overlook when publishing products, collections, blog posts, and theme images. Some stores leave it empty. Others treat the field like a keyword box and fill it with repetitive phrases.

    Neither approach is ideal.

    Good alt text describes meaningful images for people who use screen readers while also giving search engines additional context about what an image contains. On an ecommerce store, that can include the product type, color, material, visible feature, or viewing angle when those details matter.

    This guide explains how to add alt text in Shopify, how to write it correctly, what to avoid, how to handle product variants and large catalogs, and where alt text fits into a broader image SEO strategy.

    What Is Shopify Image Alt Text?

    Alt text, short for alternative text, is a written description associated with an image.

    Its primary accessibility purpose is to communicate useful image information when someone cannot see the image. Screen readers can use alt text to describe meaningful images to users who are blind or have low vision.

    Shopify’s official guidance on product media alt text describes it as an important part of product information and recommends keeping descriptions brief and descriptive.

    Alt text can also give search engines textual context about an image. That makes it part of image SEO, but it should not be treated as a place to insert as many keywords as possible.

    The best alt text describes the image accurately in the context of the page where it appears.

    Why Shopify Image Alt Text Matters

    Accessibility

    Accessibility is the first reason to write useful alt text.

    If a product image communicates information that helps someone understand or evaluate an item, a person using assistive technology should be able to access that information too.

    For example, imagine a product gallery showing the side profile, outsole, heel, and waterproof membrane of a hiking shoe. Repeating the product name for all four images would fail to communicate what each image adds.

    Image SEO

    Search engines use multiple signals to understand images, including surrounding page content, filenames, page relevance, and alternative text.

    Google’s image SEO guidance recommends descriptive alt text that helps explain the image in context.

    That does not mean adding your focus keyword to every image. If the keyword naturally describes what is visible, it can appear. If it does not, leave it out.

    Better Product Context

    Useful alt text also forces better catalog organization.

    Instead of labeling five files as “shoe,” you might distinguish them as:

    • blue waterproof trail running shoe, side view
    • blue waterproof trail running shoe, outsole view
    • blue waterproof trail running shoe, rear heel view
    • blue waterproof trail running shoe showing lace system

    That creates clearer image information for accessibility and a more disciplined product publishing workflow.

    How to Add Alt Text to Shopify Product Images

    For product media, Shopify currently provides the alt-text field directly from the product media preview.

    1. From your Shopify admin, go to Products.
    2. Open the product you want to edit.
    3. Select the relevant product media item.
    4. Open the alt-text option.
    5. Enter a brief, accurate description.
    6. Save your changes.

    Shopify recommends keeping alt text brief and descriptive. Although Shopify supports longer text, its current Help Center guidance recommends approximately 125 characters or fewer as a practical target.

    Do not treat that number as a rigid Google SEO rule. The goal is simply to communicate the image efficiently.

    Product imagery is only one part of Shopify product page SEO. Product titles, descriptions, metadata, internal links, structured data, and page usability should support the same product intent.

    How to Add Alt Text to Shopify Theme Images

    Theme images such as banners, promotional graphics, and section imagery are handled through Shopify’s theme editor.

    According to Shopify’s theme image alt-text documentation, the basic workflow is:

    1. Go to Online Store.
    2. Open the theme editor.
    3. Select the section containing the image.
    4. Choose the image’s edit option.
    5. Enter the alt text.
    6. Save the image settings and theme changes.

    The exact interface may vary slightly depending on your theme and Shopify updates, but the principle remains the same: describe meaningful imagery accurately.

    If a large store contains hundreds of products and theme assets with missing or inconsistent descriptions, get help with Shopify image optimization.

    How to Write Good Shopify Image Alt Text

    Describe What Is Actually Visible

    The simplest rule is also the most important: describe the image that is actually on the page.

    Weak:

    running shoes

    Better:

    Blue men's trail running shoes with black lug outsole, side view

    The improved version gives useful visual information without becoming excessively long.

    Include Product Details That Matter

    Useful details may include:

    • product type
    • color
    • material
    • viewing angle
    • visible feature
    • pattern
    • variant

    You do not need to mention every possible attribute.

    If the image shows a brown leather handbag from the front, there is little value in adding internal SKU numbers, shipping details, dimensions that are not visible, or unrelated sales messaging.

    Use Keywords Naturally

    When a target phrase accurately describes the image, using it naturally is fine.

    Good:

    Black leather crossbody bag with gold chain strap

    Poor:

    black bag leather bag handbag purse best black bag Shopify SEO

    The second example exists for search engines rather than users. It is harder to understand and offers no accessibility benefit.

    Avoid Starting With “Image of”

    In most cases, phrases such as “image of,” “photo of,” or “picture of” add little value because assistive technology already identifies the element as an image.

    Instead of:

    Image of a white ceramic coffee mug

    use:

    White ceramic coffee mug with curved handle

    Keep Alt Text Concise

    Write enough to communicate the useful visual information and stop there.

    A detailed technical product diagram might legitimately need more explanation than a straightforward side-view product photo. Context matters more than hitting an exact character count.

    Shopify Alt Text Examples

    Shopify image alt text optimization showing product image descriptions and SEO settings

    The right description depends on what the image actually shows.

    Product Image

    Image: White ceramic coffee mug photographed from the side

    Alt text:

    White ceramic coffee mug with curved handle, side view

    Clothing

    Image: Navy linen women’s shirt shown from the front

    Alt text:

    Women's navy linen button-down shirt, front view

    Shoes

    Image: Black hiking boots with rugged outsole

    Alt text:

    Men's black waterproof hiking boots with lug sole

    Furniture

    Image: Adjustable desk with wood top

    Alt text:

    Oak standing desk with black adjustable frame

    Lifestyle Image

    Image: Model wearing the product outdoors

    Alt text:

    Woman wearing beige linen dress outdoors

    Product Detail Shot

    Image: Close-up of stitching and zipper on a handbag

    Alt text:

    Close-up of brown leather handbag stitching and gold zipper

    Notice that none of these examples attempts to insert every possible keyword. Each one explains the useful visual information.

    When Should Alt Text Be Empty?

    Not every image needs a spoken description.

    If an image is purely decorative and communicates no information that a user needs, empty alternative text can be appropriate so assistive technology can skip it.

    Examples can include:

    • decorative separators
    • background flourishes
    • non-informational patterns
    • repeated decorative icons

    The decision depends on context.

    A star icon showing an actual customer rating communicates information. A decorative star used only as a visual flourish may not.

    This is one reason automatically populating alt text on every image without reviewing image purpose can create poor accessibility.

    Product Images vs Theme Images vs Blog Images

    Product Images

    Product image alt text should focus on what shoppers can learn from the photo.

    That could include:

    • product type
    • color
    • material
    • angle
    • important visual feature

    For stores optimizing large catalogs, alt-text implementation should be part of the same workflow used for product page optimization.

    Collection Images

    A collection image may represent an entire category rather than one specific SKU.

    For example:

    Women's waterproof hiking boots displayed on rocky trail

    Collection imagery should support the category without simply copying the collection title into every image field. It should also fit into the broader Shopify collection page SEO strategy.

    Theme and Banner Images

    A banner might communicate a seasonal product range, promotion, category, or brand message.

    If the image itself contains meaningful visual information, describe it appropriately.

    If all meaningful information already exists as accessible text next to the banner and the visual is purely decorative, repeating everything in the alt text may be unnecessary.

    Blog Images

    Blog image alt text should help readers understand why the visual exists.

    An instructional screenshot might describe the interface step being shown, while a product photo might describe the featured item.

    This complements a broader Shopify blog SEO workflow covering article structure, links, metadata, images, and publishing QA.

    How to Handle Alt Text for Product Variants

    Product galleries frequently include different colors, angles, materials, or states.

    Do not automatically reuse the exact same alt text across every image.

    For example:

    Women's red trail running shoe, side view

    Women's red trail running shoe, outsole view

    Women's blue trail running shoe, side view

    Women's blue trail running shoe, rear heel view

    These descriptions make sense because the images actually communicate different information.

    At the same time, avoid inventing differences simply to make every description unique. Accuracy matters more than uniqueness for its own sake.

    Can You Bulk Edit Shopify Image Alt Text?

    Yes. Shopify’s current product media documentation notes that alt text can be uploaded using CSV, which can be useful when managing larger catalogs.

    A bulk workflow can be significantly faster than editing hundreds or thousands of product images individually, but it creates a different challenge: quality control.

    Before importing large batches, check for:

    • duplicate descriptions
    • incorrect variants
    • wrong colors or materials
    • keyword stuffing
    • descriptions copied from filenames
    • blank meaningful images

    Use a repeatable naming and QA system rather than generating descriptions blindly.

    If your catalog needs a large-scale cleanup covering alt text, image naming, product publishing, or visual QA, discuss your Shopify image workflow with NextWebOps.

    Should You Use a Shopify Alt Text Generator?

    AI and automated alt-text tools can be useful when a store contains a large number of images.

    Shopify itself may suggest alt text in its media editor, and Shopify’s current documentation advises merchants to review suggested descriptions before accepting or editing them.

    That review step matters.

    An automated system can misidentify:

    • colors
    • materials
    • product types
    • variants
    • small visual details
    • context

    It can also generate repetitive descriptions that technically fill the field but provide little value.

    If you use automation, evaluate it based on:

    • accuracy
    • accessibility quality
    • duplicate output
    • keyword stuffing
    • product attribute accuracy
    • how easily humans can review the results

    For a catalog of 20 images, manual writing may be straightforward. For a catalog of 20,000 images, automation plus structured human QA may be much more practical.

    Common Shopify Alt Text Mistakes

    • Leaving meaningful product images blank: Important product information becomes less accessible.
    • Keyword stuffing: Alt text is a description field, not a keyword list.
    • Using identical descriptions everywhere: Different product angles and variants should be distinguished when useful.
    • Starting every description with “image of”: Usually unnecessary.
    • Describing information that is not visible: Alt text should reflect the actual image.
    • Using filenames as alt text: A filename may be descriptive, but it is not automatically a useful sentence for a screen reader.
    • Making every description excessively long: Communicate the useful information efficiently.
    • Writing only for SEO: Accessibility comes first.
    • Blindly accepting AI-generated text: Automated output still requires review.
    • Ignoring variants: Different colors and views can require different descriptions.

    Shopify Image Alt Text Checklist

    • Describe what is actually visible.
    • Keep descriptions concise and useful.
    • Include important product attributes when visible.
    • Use keywords only when they naturally describe the image.
    • Distinguish useful product angles and variants.
    • Avoid repetitive “image of” phrasing.
    • Do not keyword stuff.
    • Use empty alt text for appropriate decorative imagery.
    • Review product, collection, blog, and theme images.
    • Check bulk or AI-generated alt text for accuracy.
    • Review the live storefront after publishing.

    How Alt Text Fits Into Shopify Image SEO

    Alt text is important, but it is only one part of Shopify image optimization.

    A broader image SEO workflow should also consider:

    • descriptive filenames
    • appropriate dimensions
    • file size and delivery
    • modern image formats where appropriate
    • image quality
    • page context
    • mobile presentation
    • product gallery consistency

    It is a mistake to spend hours perfecting alt text while uploading poorly organized or unnecessarily heavy images throughout the rest of the store.

    For the broader workflow, see the NextWebOps guide to image SEO.

    Final Thoughts on Shopify Image Alt Text

    Good Shopify image alt text should be useful before it is optimized.

    Describe meaningful images accurately, include important visible product details, keep descriptions concise, and avoid treating the field as a place for repetitive keywords.

    For small catalogs, this can be managed image by image. For stores with hundreds or thousands of assets, alt text quickly becomes a content operations task involving consistency, bulk workflows, variants, automation, and QA.

    NextWebOps helps ecommerce businesses and agencies with Shopify image optimization, product publishing, image naming, on-page SEO implementation, content formatting, and publishing QA.

    Contact NextWebOps about your Shopify image optimization project.

    Frequently Asked Questions

    Does Shopify alt text help SEO?

    Alt text gives search engines additional context about image content and is part of image SEO. Its primary purpose, however, is to provide useful alternative information for people who cannot see the image. Write for accuracy and accessibility rather than inserting keywords for rankings.

    How long should Shopify image alt text be?

    Shopify currently recommends keeping alt text brief and descriptive and suggests around 125 characters or fewer. Treat that as a practical recommendation rather than a strict SEO limit. Use enough text to communicate the important visual information.

    How do I add alt text to Shopify product images?

    Open the product in Shopify admin, select the relevant product media item, open the alt-text field, enter a brief description, and save it. Shopify’s interface may evolve, so use the product media editor available in your current admin.

    How do I add alt text to Shopify theme images?

    Open your Shopify theme editor, select the section containing the image, edit the image settings, enter the alternative text, and save the theme changes.

    Should every Shopify image have alt text?

    No. Meaningful images generally need useful alternative text, while purely decorative images can appropriately use empty alt text so screen readers can skip them. The correct choice depends on what the image contributes to the page.

    Should Shopify alt text include keywords?

    A keyword can appear when it naturally describes what is visible in the image. Do not add keywords that are irrelevant to the visual content or repeat several variations simply for SEO.

    Can I bulk edit image alt text in Shopify?

    Shopify supports alt-text workflows through product data and CSV files, which can help with larger catalogs. Bulk updates should always be reviewed for inaccurate, duplicate, or over-optimized descriptions.

    What is a good Shopify product image alt text example?

    A good example is “Men’s black waterproof hiking boots with lug sole, side view.” It identifies the product and useful visible characteristics without stuffing unrelated keywords.

    Should I use an AI alt text generator for Shopify?

    AI can speed up large image workflows, but generated descriptions should be reviewed. Automation can misidentify colors, materials, variants, and product details or create repetitive text.

    Can alt text and an image filename be the same?

    They may contain similar descriptive words, but they serve different purposes. A filename is typically a short hyphenated identifier, while alt text should be a readable description that makes sense to someone using assistive technology.

  • Shopify Product Page SEO: 12 Ways to Optimize Products

    Shopify Product Page SEO: 12 Ways to Optimize Products

    Shopify product page SEO is the process of optimizing individual product pages so search engines can understand what you sell and shoppers can quickly decide whether the product meets their needs.

    A product page can have great photography and a polished design yet still underperform in organic search if the title is vague, the description is copied from a supplier, the images are oversized, the metadata is generic, or the page has few internal links.

    The strongest product pages combine SEO with ecommerce usability. They target the right search intent, explain the product clearly, load efficiently, provide useful images and specifications, and make purchasing straightforward.

    This guide walks through 12 practical ways to optimize Shopify product pages, from keyword targeting and descriptions to images, structured data, internal links, mobile usability, and final publishing QA.

    What Is Shopify Product Page SEO?

    Shopify product page SEO focuses on improving an individual product URL for relevant searches.

    A Shopify store usually contains different page types with different SEO jobs:

    • Homepage: represents the broader brand and business.
    • Collection pages: target broader categories where shoppers want to compare products.
    • Product pages: target searches for a specific product, model, material, feature combination, or use case.
    • Blog posts: answer informational questions earlier in the customer journey.

    For example, someone searching for women’s running shoes will often benefit from a collection containing multiple options. Someone searching for a particular shoe model may be better served by the individual product page.

    Shopify’s official ecommerce product page SEO guide similarly emphasizes product titles, descriptions, images, internal linking, page speed, structured data, mobile usability, reviews, and conversion elements.

    The goal is not simply to insert keywords. It is to make the page clearly relevant to the right search while giving the shopper enough information to make a confident decision.

    How to Optimize Shopify Product Pages for SEO

    1. Choose the Right Product-Level Keyword

    Start with search intent.

    A product page should generally target a query specific enough that someone searching it would reasonably want to land on one product rather than browse an entire category.

    For example, imagine you sell a waterproof women’s trail running shoe.

    A suitable product-level keyword might relate to:

    • the specific product name
    • the model
    • brand + model searches
    • a distinctive material or feature
    • a specific use case

    Trying to make one product page rank for an extremely broad term such as women’s shoes is usually a poor fit. A collection page is generally better suited to that broader search.

    Shopify’s current SEO guidance recommends matching page type to search intent: specific product searches can fit product pages, while broader category searches are often better suited to collections.

    This page-type distinction should be part of your wider Shopify homepage SEO and site keyword strategy rather than deciding keywords one product at a time.

    2. Write a Clear, Descriptive Product Title

    The product title should tell customers what the item is without making them decode an internal model number or marketing name.

    For example:

    Weak: XR200

    More descriptive: XR200 Women’s Waterproof Trail Running Shoes

    The second version provides context while preserving the model name.

    That does not mean every product title needs to contain every possible attribute. Include details that genuinely help identify the product.

    A title overloaded with repeated keywords can become difficult to scan:

    Poor: Women’s Waterproof Trail Running Shoes Lightweight Women’s Trail Shoes Waterproof Running Shoes

    Use natural language. The product title should first make sense to the person considering buying it.

    3. Write Unique, Helpful Product Descriptions

    Product descriptions are one of the biggest opportunities for Shopify stores to improve both SEO and customer experience.

    Avoid copying manufacturer or supplier descriptions across your catalog whenever you can provide better original information.

    A useful description should explain:

    • what the product is
    • who it is designed for
    • what problem it solves
    • important features
    • materials
    • dimensions or specifications
    • fit or sizing where relevant
    • care or usage information

    For example, instead of:

    Premium trail shoe made with high-quality materials.

    you could provide:

    Designed for wet and uneven trails, the XR200 combines a waterproof upper with a high-grip outsole and cushioned midsole. Its lightweight construction makes it suitable for everyday trail running while the reinforced toe provides additional protection on rocky terrain.

    The second description helps search engines understand the product because it also helps the customer understand the product.

    For longer descriptions, use short paragraphs, bullet points, and useful sections rather than publishing one large block of text.

    If your team already has product copy but needs consistent implementation across Shopify, get help with Shopify product page implementation.

    4. Optimize the SEO Title and Meta Description

    Shopify lets you edit the search engine listing for a product independently from some of the visible page content.

    Your SEO title should accurately summarize the product and include the main search topic when it reads naturally.

    Example:

    SEO Title: Women’s Waterproof Trail Running Shoes | Brand

    A useful meta description could be:

    Shop lightweight women’s waterproof trail running shoes designed for grip, comfort, and stability across wet and technical terrain.

    The description should encourage a relevant shopper to click rather than simply repeat keywords.

    Avoid using the same generic meta description across hundreds of products. Important product pages should have metadata that reflects the actual item.

    If you are optimizing multiple Shopify templates, this broader Shopify on-page SEO guide provides a workflow covering titles, descriptions, URLs, images, internal links, and other page-level elements.

    5. Keep the Product URL Clean

    A clean Shopify product handle is easier to understand than an internal product code or automatically generated phrase.

    For example:

    /products/womens-waterproof-trail-running-shoes

    is clearer than:

    /products/item-4729-new-final-product

    Do not add unnecessary words just to make the URL longer or repeat the target keyword.

    Also avoid changing established URLs solely for cosmetic SEO reasons. If an existing product page already has traffic, backlinks, rankings, or internal links, changing the handle creates additional work and potential risk.

    When a URL genuinely needs to change, make sure the old URL redirects appropriately.

    6. Optimize Product Images

    Product images influence both customer confidence and page performance.

    Before uploading images to Shopify:

    • resize them for realistic website use
    • compress unnecessary file size
    • use an efficient format such as WebP where appropriate
    • rename generic files descriptively
    • write accurate alt text for meaningful images
    • check mobile display
    • keep product imagery consistent across the catalog

    Instead of:

    IMG_8241.jpg

    use something more descriptive, such as:

    xr200-womens-waterproof-trail-shoe-side.webp

    If another image shows the sole, its filename and alt text should describe that different view rather than duplicating the first image’s text.

    Google’s image SEO best practices recommend useful image context, descriptive information, and accessible image implementation. Google also advises against keyword-stuffed alternative text.

    For a full implementation workflow, see the NextWebOps guide to image SEO.

    7. Build Internal Links Around Product Pages

    Product pages should not exist as isolated URLs that can only be reached through site search.

    Relevant internal links can point to a product page from:

    • its parent collection
    • related collections
    • buying guides
    • blog posts
    • comparison articles
    • homepage features where appropriate

    The product page can also link out to useful pages such as:

    • the parent collection
    • related products
    • sizing guides
    • care instructions
    • shipping information
    • relevant educational content

    For example, an article explaining how to choose trail running shoes can link naturally to a relevant product once the reader understands which characteristics to look for.

    This is why your Shopify blog SEO strategy should work together with product SEO instead of treating blog traffic as a separate channel.

    Likewise, broader category searches should usually be supported by properly optimized Shopify collection pages, which can then distribute users and internal-link equity toward individual products.

    8. Verify Product Structured Data

    Structured data can help search engines understand important ecommerce information in a machine-readable format.

    Google’s official Product structured data documentation explains that eligible product information can include details such as price, availability, ratings, shipping information, and other merchant data.

    Before adding another schema app, inspect what your Shopify theme already outputs.

    Many themes include product-related structured data, and installing multiple tools that generate overlapping markup can create unnecessary duplication or conflicts.

    Check:

    • product name
    • price
    • availability
    • currency
    • review information where eligible
    • variant information where applicable

    Use Google’s Rich Results Test and Search Console to investigate structured-data errors rather than assuming the implementation is correct because JSON-LD exists in the source code.

    9. Add Reviews and Useful Trust Information

    Product pages need to answer questions that affect buying confidence.

    Depending on the product, useful trust information may include:

    • customer reviews
    • ratings
    • availability
    • shipping information
    • returns information
    • warranty details
    • materials
    • dimensions
    • size guidance

    Do not treat reviews as an excuse to manufacture user-generated content or make unsupported SEO claims.

    Genuine reviews can help potential customers evaluate products, and eligible review data may also form part of structured product information.

    Shopify’s current product-page guidance also emphasizes reviews, product imagery, descriptions, clear calls to action, and mobile usability as important parts of an effective ecommerce page.

    10. Improve Mobile UX and Page Speed

    Many ecommerce visitors will view product pages on phones, so desktop-only optimization is not enough.

    Check the page on a real mobile-sized viewport.

    Review:

    • product gallery behavior
    • variant selectors
    • price visibility
    • Add to Cart button placement
    • description readability
    • review widgets
    • sticky bars
    • popups
    • image loading

    Third-party Shopify apps can also add scripts, widgets, trackers, and functionality that increase page complexity. Remove apps and page elements that no longer provide enough value to justify their performance cost.

    Large product images are another common source of unnecessary page weight, which is why image optimization should happen before publishing rather than after performance problems appear.

    11. Avoid Duplicate and Thin Product Content

    Duplicate product content can appear when stores reuse supplier descriptions across many websites or publish nearly identical copy across several variants.

    Where products genuinely differ, explain those differences.

    Useful distinctions might include:

    • materials
    • dimensions
    • compatibility
    • fit
    • intended use
    • features
    • included accessories

    Do not create artificial differences solely to make every page look unique.

    Variant handling also requires care. Color, size, bundle, and other configurations can be implemented differently depending on the Shopify theme and apps being used.

    Review the actual URLs, canonical tags, and indexability of your store instead of assuming every Shopify setup handles variants identically.

    12. Complete a Final Shopify Product Page SEO QA Check

    A product page is not finished when all the fields inside Shopify have been populated.

    Review the live page after publishing.

    Check:

    • product title
    • primary keyword alignment
    • unique product description
    • SEO title
    • meta description
    • URL
    • image quality
    • image filenames
    • alt text
    • internal links
    • price and availability
    • variants
    • structured data
    • reviews
    • Add to Cart functionality
    • mobile layout
    • broken links
    • indexability

    Then test the actual purchasing experience.

    Can customers select the correct variant? Can they understand what they are buying? Is the price clear? Does the Add to Cart button work? Are important product details visible without unnecessary friction?

    This final QA stage is particularly important when managing dozens or hundreds of product pages because small implementation mistakes can be repeated across an entire catalog.

    If you need help checking product descriptions, images, links, metadata, formatting, and live storefront presentation, discuss your Shopify publishing workflow with NextWebOps.

    Shopify Product Page SEO Example

    Consider a store selling a product called the XR200 Women’s Waterproof Trail Running Shoe.

    A practical SEO setup might look like this:

    • Primary topic: women’s waterproof trail running shoes
    • Product title: XR200 Women’s Waterproof Trail Running Shoes
    • URL: /products/xr200-womens-waterproof-trail-running-shoes
    • Opening copy: Explain that the shoe is designed for wet and technical trails and summarize its primary benefits.
    • Features: Waterproof upper, high-grip outsole, cushioned midsole, reinforced toe.
    • Additional information: Fit, sizing, materials, weight, intended terrain, and care information.
    • Image filename: xr200-womens-waterproof-trail-shoe.webp
    • Alt text: Women’s XR200 waterproof trail running shoe in blue and black.
    • SEO title: XR200 Women’s Waterproof Trail Running Shoes
    • Meta description: Shop XR200 women’s waterproof trail running shoes built for grip, comfort, and stability across wet and technical trails.
    • Internal links: Women’s trail running shoes collection, trail running guide, sizing guide.
    • Structured data: Verify price, availability, product information, and eligible review data.

    Notice that the keyword is not repeated in every field mechanically.

    Each element has its own purpose while reinforcing a consistent understanding of what the product is.

    Shopify Product Page SEO Template

    Use this framework when preparing new Shopify products.

    Product Title

    [Product/Model Name] + [Useful Product Type or Differentiator]

    Opening Product Description

    Explain what the product is, who it is designed for, and its primary benefit in a short opening paragraph.

    Key Features

    • Feature and customer benefit
    • Feature and customer benefit
    • Feature and customer benefit

    Specifications

    • Materials
    • Dimensions
    • Weight
    • Compatibility
    • Included items

    Additional Helpful Information

    Depending on the product, add sizing, care instructions, installation guidance, warranty information, or answers to common buying questions.

    SEO Fields

    • Primary keyword or keyword theme
    • SEO title
    • Meta description
    • Product handle
    • Image filenames
    • Alt text
    • Internal links

    This structure does not need to be identical on every product. Adapt it to what customers genuinely need to know.

    Shopify Product Page SEO Checklist

    Shopify product page SEO checklist for content, images, metadata, internal links, schema and publishing QA

    • Choose an appropriate product-level keyword.
    • Confirm the search intent suits a product page.
    • Use a clear and descriptive product title.
    • Write original, useful product content.
    • Add unique SEO metadata.
    • Use a clean product handle.
    • Optimize product images.
    • Add contextual internal links.
    • Verify Product structured data.
    • Add useful reviews and trust information.
    • Test the page on mobile.
    • Complete live-page publishing QA.

    Product Page vs Collection Page SEO

    Choosing the correct page type is one of the most important ecommerce SEO decisions.

    A product page works best when the search is specific.

    For example:

    Search: XR200 waterproof trail shoe

    A specific product page can be a strong match.

    A collection page is generally better when the searcher wants choices.

    For example:

    Search: women’s trail running shoes

    A page showing several relevant shoes gives that customer more useful options.

    Trying to make one product page rank for every broad category query can create poor search-intent alignment and internal competition.

    Use your Shopify collection page SEO strategy for broader commercial categories and reserve product pages for more specific product-level intent.

    Common Shopify Product Page SEO Mistakes

    Many product-page issues are not advanced technical SEO problems. They are repeated publishing problems.

    • Copying supplier descriptions: Generic copy rarely gives your store a strong, distinctive product explanation.
    • Using unclear product titles: Internal model names alone may not tell shoppers what the item is.
    • Duplicating metadata: Reusing one title or description across a catalog reduces page specificity.
    • Uploading oversized images: Huge source files add unnecessary page weight.
    • Using generic filenames: Names such as IMG_4721.jpg provide little descriptive context.
    • Forgetting internal links: Products should connect to relevant collections and supporting content.
    • Installing unnecessary schema apps: Check existing theme output before adding overlapping markup.
    • Targeting broad category terms: Not every keyword belongs on a product page.
    • Ignoring mobile usability: A desktop-friendly product page may still be frustrating on a phone.
    • Skipping final QA: Always inspect the live storefront after publishing.

    Final Thoughts on Shopify Product Page SEO

    Strong Shopify product page SEO comes from aligning the page with the right search intent and then implementing every important detail consistently.

    The product title, description, metadata, images, links, structured data, reviews, page speed, mobile layout, and purchasing experience should all work together.

    For a small store, these tasks may be manageable product by product. For catalogs containing hundreds or thousands of items, consistent implementation becomes a content operations challenge as much as an SEO challenge.

    NextWebOps helps businesses and agencies with Shopify product publishing, content formatting, metadata, image optimization, internal linking, on-page SEO implementation, and publishing QA.

    Contact NextWebOps about your Shopify catalog.

    Frequently Asked Questions

    How do I improve SEO on a Shopify product page?

    Start by matching the page to an appropriate product-level search intent. Then optimize the product title, original description, SEO title, meta description, URL, images, internal links, structured data, mobile presentation, and live-page implementation.

    What should I put in a Shopify product description for SEO?

    Describe what the product is, who it is for, its primary benefits, important features, specifications, materials, sizing, use cases, and other information customers need to make a decision. Use relevant terminology naturally rather than repeating a target keyword.

    Should every Shopify product page target a different keyword?

    Each product should have a distinct purpose, but keyword overlap is natural when products are similar. Focus on accurately representing each product rather than forcing an artificial unique keyword onto every SKU. Broader category keywords may be better targeted with collection pages.

    How long should Shopify product descriptions be?

    There is no universal ideal length. The description should be long enough to answer important buying questions without adding filler. A simple product may need relatively little copy, while a technical or expensive product may require significantly more detail.

    Do product reviews help Shopify SEO?

    Genuine reviews can improve shopper confidence and add useful customer-generated information to a product page. Eligible review data may also be represented through structured data. Reviews should primarily be treated as a trust and conversion feature rather than a guaranteed ranking tactic.

    Should Shopify product pages link to collection pages?

    Yes, when the collection is useful to the shopper. Linking back to a parent or related collection can help users explore alternatives and strengthens the relationship between product and category pages.

    How do I optimize Shopify product images for SEO?

    Use appropriately sized and compressed images, descriptive filenames, useful alt text for meaningful images, efficient file formats, and clear product photography. Always check how the images display on desktop and mobile.

    Does Shopify automatically add Product schema?

    Many Shopify themes output product-related structured data, but implementation varies by theme and apps. Inspect and test your actual product pages before assuming the required information is present or adding another schema solution.

    Should I change old Shopify product URLs for SEO?

    Do not change an established product URL simply because a different handle appears slightly more optimized. Consider existing rankings, backlinks, traffic, and internal links first. If a change is genuinely necessary, use the appropriate redirect.

    What is the difference between Shopify product page SEO and collection page SEO?

    Product page SEO focuses on individual products and specific product-level searches. Collection page SEO focuses on broader categories where shoppers want to compare multiple products. Choosing the correct page type depends primarily on search intent.

  • Shopify Blog SEO: 12 Ways to Optimize Blog Posts

    Shopify Blog SEO: 12 Ways to Optimize Blog Posts

    Shopify blog SEO is not simply publishing articles and waiting for Google traffic. A blog can attract potential customers, answer questions before they buy, strengthen your internal linking, and introduce shoppers to relevant products and collections—but only when the content is built around useful search intent and implemented correctly.

    For Shopify stores, the best blog content usually sits between information and commerce. It answers a real customer question first, then gives that reader a logical next step toward a product, collection, buying guide, or other useful page.

    This guide explains 12 practical ways to optimize Shopify blog posts for organic search, from choosing the right topics to formatting, internal linking, image optimization, content updates, and final publishing QA.

    What Is Shopify Blog SEO?

    Shopify blog SEO is the process of creating and optimizing blog posts so search engines can understand them and relevant customers can discover them through organic search.

    It includes more than adding keywords. A well-optimized Shopify blog post typically combines:

    • useful topic selection
    • clear search intent
    • strong on-page structure
    • descriptive titles and metadata
    • internal links
    • optimized images
    • relevant product or collection connections
    • technical and publishing QA

    Shopify’s own blog SEO guidance recommends choosing topics with keyword research, checking those topics against business goals, structuring articles clearly, using internal links, adding multimedia, monitoring technical issues, and updating older content.

    That last point matters. Your blog should not operate separately from the rest of your ecommerce store. Strong blog SEO should support the customer journey and strengthen the relationship between informational content and commercial pages.

    How to Optimize Shopify Blog Posts for SEO

    1. Choose Topics That Support Your Products and Customers

    The strongest Shopify blog topics usually come from the overlap between what people search for and what your business actually sells or understands well.

    Imagine you run a store selling hiking footwear.

    Relevant blog topics might include:

    • how to choose hiking boots
    • how should hiking boots fit?
    • waterproof vs non-waterproof hiking boots
    • hiking shoes vs hiking boots
    • how to break in hiking boots

    Those topics attract people who may eventually need the products you sell.

    A high-volume topic that has nothing to do with your store might bring visitors but contribute little to product discovery, topical authority, or revenue.

    Before choosing a keyword, ask:

    • Would our target customer realistically search for this?
    • Do we have useful expertise or information to add?
    • Does the topic relate to a product category, customer problem, or buying decision?
    • Can the article naturally connect to another useful page on the store?

    If the answer to those questions is mostly no, search volume alone is not a strong reason to publish the article.

    A documented planning process also helps prevent random topic selection. This guide on how to create an SEO content brief can help you map search intent, structure, supporting keywords, and content requirements before writing begins.

    2. Target One Clear Primary Keyword

    Each important blog post should have a clear primary search topic.

    That does not mean repeating the exact keyword in every paragraph. It means building one page around one main intent.

    For example:

    Primary keyword: how to choose hiking boots

    Supporting concepts might include:

    • hiking boot fit
    • boot height
    • waterproof hiking boots
    • hiking boot materials
    • day hiking vs backpacking boots

    These related concepts make sense because they help answer the main question.

    Avoid creating several posts that all target virtually the same keyword with slightly different wording. For example:

    • how to choose hiking boots
    • how to pick hiking boots
    • how to select hiking boots

    Those may represent the same underlying intent and may be better handled by one comprehensive article.

    Keyword mapping before publishing helps reduce this kind of overlap.

    3. Match the Content Format to Search Intent

    Choosing a relevant keyword is only the first step. You also need to understand what type of answer searchers expect.

    A search query might call for:

    • a how-to guide
    • a comparison
    • a checklist
    • a buying guide
    • a troubleshooting article
    • a definition
    • a tutorial

    Before drafting, inspect the current search results.

    If most ranking pages for a query are detailed tutorials, publishing a short product-focused article may not satisfy the same intent.

    If the query is highly commercial, a product or collection page may be a better target than a blog article in the first place.

    This is why search intent should be decided before writing, not after the article has already been drafted.

    4. Write a Strong SEO Title and Article Title

    Your title needs to explain the topic quickly.

    Where it reads naturally, place the primary keyword near the beginning.

    For example:

    Weak: Great Ways to Get More Traffic From Your Shopify Articles

    Better: Shopify Blog SEO: 12 Ways to Optimize Blog Posts

    The second version tells the reader exactly what the article covers.

    Google’s title link guidance recommends descriptive, concise page titles and warns against vague or unnecessarily long title text.

    Your SEO title and article headline can be slightly different when there is a good reason, but they should describe the same page accurately.

    Avoid forcing extra keyword variants into the title solely for SEO.

    5. Keep the Shopify Blog URL Clear

    Shopify blog posts normally use a URL structure that includes the blog path and an editable article handle.

    For example:

    /blogs/news/shopify-blog-seo

    The editable part should be short and descriptive.

    Avoid handles such as:

    /blogs/news/12-best-amazing-shopify-blog-seo-tips-you-need-to-know-2026

    Dates are especially worth considering carefully. If an article is intended to stay evergreen, placing a year in the URL can make future updates awkward.

    If an existing post already has backlinks, rankings, or traffic, do not change its URL just to make the slug marginally prettier. URL changes should have a clear reason and should be handled with proper redirects.

    6. Structure Blog Posts With Clear H2 and H3 Headings

    Good formatting helps both readers and search engines understand the article.

    Use H2 headings for major sections and H3 headings for related subsections.

    For example:

    H2: How to Choose Hiking Boots

    H3: Choose the Right Boot Height

    H3: Check the Fit

    H3: Decide Whether You Need Waterproofing

    Headings should describe the section beneath them. Do not create awkward headings simply to include another keyword variation.

    Also use:

    • short paragraphs
    • bulleted lists where useful
    • clear examples
    • logical section ordering
    • bold text selectively

    A wall of text may contain excellent information but still be difficult for a customer to use.

    Formatting is especially important on mobile, where long paragraphs and unclear sections become harder to scan.

    7. Optimize the Meta Description

    The meta description should give searchers a useful summary of the page and a reason to consider clicking.

    For this article, an appropriate example would be:

    Improve Shopify blog SEO with practical tips for keywords, content, internal links, images, metadata, product links, and publishing QA.

    Include the main topic naturally, but do not treat the meta description as a container for every secondary keyword.

    Important posts should also avoid sharing identical descriptions.

    Remember that Google may generate a different search snippet when it believes another section of the page better matches the query. Your meta description is useful guidance, not a guaranteed search result.

    8. Add Strategic Internal Links

    Internal linking is especially important for ecommerce blogs because it connects informational content with the rest of the customer journey.

    A Shopify blog post can link to:

    • related articles
    • relevant collections
    • appropriate products
    • buying guides
    • helpful evergreen resources

    For example, an article about choosing hiking boots could naturally link to:

    • a hiking boots collection
    • a waterproof hiking boots collection
    • a hiking boot sizing guide
    • a related hiking socks guide

    Use descriptive anchor text rather than generic phrases such as “click here.”

    There is another internal-linking step that ecommerce sites often miss: after publishing a new article, identify older relevant posts and add links to the new article.

    This makes the new page less isolated and strengthens the relationships between related content.

    Shopify’s current SEO checklist describes internal linking as an important tactic for helping search engines categorize related content and helping users discover deeper information. For a more detailed workflow, see these internal linking best practices.

    Need help implementing links, formatting, metadata, and other SEO elements across a Shopify content library? Get help with Shopify content publishing.

    9. Connect Informational Posts to Products and Collections

    Traffic is valuable, but qualified traffic should have somewhere useful to go next.

    This is where ecommerce blog SEO differs from generic publishing.

    Suppose someone searches:

    how to choose trail running shoes

    Your article might explain:

    • terrain
    • grip
    • cushioning
    • heel-to-toe drop
    • fit
    • waterproofing

    Once those concepts are explained, a contextual link to a trail running shoe collection can be genuinely useful.

    The important word is contextual.

    Do not insert product links simply because the article has traffic. Connect the reader to a product or collection when that page logically helps with the next step.

    Broad buying guides may link more naturally to collections, while highly specific tutorials might link to individual products.

    This approach creates a cleaner path:

    Search query → useful article → relevant collection or product → purchase consideration

    That is more valuable than treating the blog as a separate traffic channel with no connection to the store.

    10. Optimize Blog Images

    Images can make tutorials, comparisons, and buying guides easier to understand, but poorly optimized media can also make posts unnecessarily heavy.

    Before uploading an image:

    • resize it to appropriate dimensions
    • compress unnecessary file size
    • use an efficient format such as WebP when appropriate
    • give the file a descriptive filename
    • write appropriate alt text
    • check how it displays on mobile

    For example:

    shopify-blog-seo-checklist.webp

    is more descriptive than:

    IMG_8294.webp

    Google’s official image SEO documentation recommends useful, contextual alt text and short descriptive filenames rather than generic file names or keyword stuffing.

    Alt text should describe the actual image. Do not insert a target keyword into every image description when it does not belong there.

    For a more detailed workflow, see this guide to image SEO.

    11. Refresh Older Shopify Blog Posts

    Publishing new articles is only part of content SEO.

    Older posts may become less useful because:

    • screenshots are outdated
    • products or collections have changed
    • statistics are old
    • links no longer work
    • competitors now cover the topic more thoroughly
    • search intent has changed
    • the article lacks links to newer content

    Periodically review important posts in Google Search Console.

    Look for declining impressions, lost clicks, outdated information, or opportunities to improve internal links.

    An update might include:

    • rewriting weak sections
    • adding missing subtopics
    • replacing old screenshots
    • adding newer internal links
    • improving image optimization
    • checking titles and descriptions
    • fixing broken links

    Avoid changing the URL of a successful post simply because you update its content.

    For a step-by-step workflow, see how to update old blog posts for SEO.

    12. Complete a Final Shopify Blog SEO QA Check

    Publishing QA is one of the most overlooked parts of Shopify blog SEO.

    A strong draft can still go live with incorrect headings, missing links, poor image formatting, or incomplete metadata.

    Before publishing, check:

    • primary keyword and search intent
    • article title
    • SEO title
    • URL handle
    • meta description
    • H2 and H3 hierarchy
    • paragraph formatting
    • internal links
    • product or collection links
    • external sources
    • image filenames
    • alt text
    • mobile presentation
    • broken links
    • indexability

    Then review the actual live article.

    Do not stop at the Shopify editor preview. Open the published page on desktop and mobile and verify that links, headings, images, spacing, and calls to action appear correctly.

    Shopify’s 2026 SEO checklist notes that the platform handles several SEO defaults, including XML sitemaps and canonical tags, but store content, themes, apps, internal linking, and publishing decisions still require active management.

    If your team writes the content but needs support implementing metadata, images, links, formatting, and final checks, discuss your Shopify content implementation workflow.

    How Shopify Blog Content Supports Ecommerce SEO

    A Shopify blog can support more than blog traffic.

    Useful content can attract people earlier in the buying journey and help them understand products before they are ready to shop.

    For example:

    A customer searching how to choose a standing desk may not be ready to search for a particular product yet.

    A useful article can explain:

    • desk height
    • desk dimensions
    • motor types
    • weight capacity
    • workspace size
    • ergonomic considerations

    From there, the reader can move naturally to a standing desk collection.

    Blog content can therefore support ecommerce SEO by:

    • targeting informational searches that product pages cannot satisfy well
    • building topical depth around product categories
    • creating internal-link opportunities
    • earning external links where content is genuinely useful
    • helping customers make buying decisions
    • introducing relevant products and collections

    However, simply publishing more blog posts does not automatically improve product rankings.

    The value comes from relevance, quality, internal linking, site structure, useful information, and how effectively the content connects with the rest of the store.

    Shopify Blog SEO Example

    Consider an outdoor footwear store that wants to rank for:

    how to choose hiking boots

    A strong article might include:

    Understand the Types of Hiking Boots

    Explain light hiking shoes, day-hiking boots, and heavier backpacking footwear.

    Choose the Right Fit

    Explain toe room, heel movement, sock thickness, and trying footwear under realistic conditions.

    Consider Your Terrain

    Discuss smoother maintained trails versus rocky or technical terrain.

    Decide Whether You Need Waterproofing

    Explain common use cases and trade-offs rather than simply recommending one option for everyone.

    Choose the Right Materials

    Explain common upper and sole materials where useful.

    The post could then link contextually to:

    • the hiking boots collection
    • waterproof hiking boots
    • hiking socks
    • a sizing guide
    • another article about breaking in hiking boots

    This is a much stronger ecommerce content strategy than publishing a general outdoor article that attracts traffic but has no meaningful relationship to the products the store sells.

    Shopify Blog SEO Checklist


    Shopify blog SEO checklist from keyword research to publishing QA

    Before publishing a Shopify blog post, confirm that you have:

    • chosen a business-relevant primary keyword
    • checked the search intent
    • reviewed competing search results
    • written a clear article title
    • created a concise URL handle
    • organized the content with H2 and H3 headings
    • written a useful meta description
    • added relevant internal links
    • linked suitable products or collections where helpful
    • included authoritative external sources where appropriate
    • optimized images and alt text
    • checked the post on mobile
    • reviewed the live article after publishing

    For Shopify stores publishing content at scale, the challenge is often not knowing what good SEO looks like. It is implementing those requirements consistently across every article.

    Contact NextWebOps for Shopify publishing and SEO implementation support.

    Does Blogging Help Shopify SEO?

    Blogging can support Shopify SEO when the content serves topics relevant to your customers and products.

    A blog gives an ecommerce store the ability to target questions and informational searches that would not fit naturally on product or collection pages.

    For example, a cookware store may struggle to target:

    how to season a cast iron skillet

    with a product page.

    A blog post is a much better format for that question. The article can solve the immediate problem while linking naturally to cast iron cookware, care accessories, or related guides.

    Blogging becomes less useful when stores publish generic content simply to increase article count.

    Posting three times per week is not automatically better than publishing one genuinely useful article that matches an important customer question.

    Quality, relevance, usefulness, and strategic connections to the rest of the site matter more than arbitrary publishing frequency.

    Common Shopify Blog SEO Mistakes

    Many Shopify stores publish useful content but lose SEO value through avoidable implementation problems.

    Common mistakes include:

    • Choosing topics based only on volume: Traffic that has no relationship to the store may have limited commercial value.
    • Ignoring search intent: A well-written article can still struggle if it uses the wrong format for the query.
    • Targeting the same topic repeatedly: Several similar posts can create unnecessary overlap.
    • Using vague titles: Readers and search engines should understand the topic immediately.
    • Forgetting internal links: New articles should connect to relevant existing pages.
    • Ignoring older posts: Outdated content can lose usefulness over time.
    • Uploading oversized images: Heavy media can make otherwise useful articles unnecessarily slow.
    • Forgetting products and collections: Ecommerce blog traffic should have useful next steps.
    • Publishing without QA: Broken links, incorrect headings, and missing metadata can undermine a strong draft.
    • Writing for an SEO score instead of the reader: Plugin scores can help identify missing basics, but they should not dictate awkward keyword repetition or unnecessary content.

    Final Thoughts on Shopify Blog SEO

    The best Shopify blog SEO strategy does not begin with publishing volume. It begins with useful topics that match customer searches and connect naturally to the products and expertise behind the store.

    From there, execution matters.

    Every important article should have a clear keyword and intent, logical headings, useful metadata, strategic internal links, optimized images, relevant product or collection paths, and a final live-page QA check.

    That creates a content system rather than a collection of disconnected blog posts.

    For ecommerce businesses and agencies managing ongoing content production, consistent implementation can become a substantial workload. NextWebOps supports Shopify content publishing, formatting, metadata, internal linking, image optimization, on-page SEO implementation, and publishing QA.

    Contact NextWebOps about your Shopify content publishing needs.

    Frequently Asked Questions

    Does blogging help Shopify SEO?

    Blogging can support Shopify SEO when posts answer relevant customer searches, provide genuinely useful information, connect to related site content, and support important products or collections. Publishing articles simply to increase content volume is unlikely to be as valuable as building focused topical coverage.

    Is Shopify good for blogging?

    Shopify includes built-in blogging functionality that is sufficient for many ecommerce stores. It allows merchants to publish articles within the same domain as their store, add content and images, manage article handles, and connect blog posts to other store pages. The more important question is whether the blog content itself is useful and implemented correctly.

    How often should I publish Shopify blog posts?

    There is no universal publishing frequency required for SEO. Choose a schedule your team can maintain without sacrificing research, usefulness, optimization, or quality. One strong article every two weeks can be more valuable than several weak posts published only to meet a quota.

    How do I optimize a Shopify blog post for SEO?

    Start with a relevant keyword and search intent, use a clear title and URL, organize the article with logical headings, write useful content, add internal and authoritative external links, optimize images and metadata, connect the article to appropriate products or collections, and review the live page after publishing.

    Should Shopify blog posts link to products?

    Yes, when the product is genuinely relevant to what the reader is trying to accomplish. Product links should feel like a useful next step rather than an unrelated sales insertion.

    Should Shopify blog posts link to collection pages?

    Collection links are often useful when the article discusses a broader product category and readers may want to compare multiple options. For example, an article about choosing running shoes may naturally link to a running shoe collection rather than one individual product.

    How long should a Shopify blog post be?

    There is no ideal word count that applies to every query. The article should be long enough to answer the searcher’s question thoroughly without adding filler. Some focused questions may need only a concise answer, while complex comparisons and buying guides may require substantially more detail.

    Can I update old Shopify blog posts for SEO?

    Yes. Updating older content can improve usefulness when information, screenshots, internal links, products, or search expectations have changed. Preserve established URLs when possible and focus on meaningful improvements rather than changing publication dates without substantially updating the content.