Image SEO is the process of optimizing website images so search engines can discover, understand, and display them appropriately while users get a fast, accessible, and visually useful experience.
Good image optimization goes well beyond adding a keyword to an alt attribute. It involves choosing relevant visuals, using descriptive filenames, selecting efficient formats, resizing and compressing files, adding appropriate alternative text, placing images in useful context, and checking that they load correctly across devices.
Done properly, image SEO can support your visibility in Google Search and Google Images while also improving page performance and accessibility.
This guide walks through 12 practical image SEO best practices you can apply when publishing or updating website content.
What Is Image SEO?
Image SEO means optimizing the images on a website so they are useful to visitors and easier for search engines to discover and understand.
That can include:
- Choosing images that match the surrounding content
- Using descriptive image filenames
- Writing useful alt text
- Choosing an appropriate file format
- Reducing unnecessary file size
- Serving images at appropriate dimensions
- Using responsive images
- Making important images accessible to search engine crawlers
- Providing relevant surrounding text and captions
- Checking image implementation before publishing
Image optimization is therefore both an SEO task and a website publishing task. A well-optimized image should make sense within the page, load efficiently, work across screen sizes, and provide useful information when the image itself cannot be seen.
Why Image SEO Matters
Images are often treated as decoration added after a page has been written. In reality, they are part of the page experience and should be considered during content implementation.
Effective image SEO can contribute to several areas.
Search visibility
Relevant, crawlable, properly contextualized images can give search engines additional information about a page. Images may also appear in Google Images and other search features where visual content is displayed.
Page performance
Uploading an unnecessarily large image can increase the amount of data a browser has to download. Resizing, compressing, and selecting an efficient format can reduce that overhead while maintaining acceptable visual quality.
User experience
Images should look sharp without slowing down the page. They should also adapt to different devices rather than forcing mobile visitors to download or display images designed only for large desktop screens.
Accessibility
Alternative text can communicate the purpose or content of meaningful images to people using screen readers. This is why alt text should be written primarily to describe the image in context rather than simply to insert SEO keywords.
Image optimization should be part of a broader on-page SEO checklist rather than an isolated task.
12 Image SEO Best Practices
1. Use Relevant Images That Support the Page
Start with image relevance.
An image should help explain, demonstrate, compare, or support the content around it. Adding unrelated stock photography simply because a section looks empty provides little value to either users or search engines.
For example, a guide about optimizing WordPress images would benefit more from a screenshot showing image settings, a before-and-after optimization example, or a simple instructional graphic than from a generic photo of someone using a laptop.
Whenever possible, use original screenshots, diagrams, examples, product images, charts, or branded graphics that contribute directly to the page.
2. Rename Image Files Before Uploading
Camera-generated names and automatic export filenames rarely explain what an image contains.
Instead of uploading:
IMG_4582.jpg
use a descriptive filename such as:
wordpress-image-optimization.webp
A useful filename is short, readable, and descriptive. Separate words with hyphens and avoid stuffing several variations of the same keyword into the filename.
For example, this would be unnecessary:
image-seo-image-optimization-seo-image-best-practices.webp
The goal is description, not keyword density.
3. Write Useful Alt Text
Alt text describes the purpose or content of an image when the image cannot be viewed. It is particularly important for accessibility and can also provide search engines with contextual information about meaningful images.
Good alt text describes what matters about the image within the surrounding content.
Suppose an article contains a screenshot comparing an original 1.8 MB JPEG with an optimized 120 KB WebP version.
Weak alt text:
image seo
Better alt text:
Comparison of original JPEG and compressed WebP image file sizes
The second version actually explains what the reader would see.
Do not force your focus keyword into every alt attribute. If the keyword accurately describes an image, using it can be natural. If it does not, leave it out.
Decorative images that add no meaningful information may not need descriptive alt text at all, depending on how they are implemented.
4. Choose the Right Image Format
There is no single image format that is automatically best for every situation.
- WebP: A practical modern choice for many website photographs and graphics because it can provide good visual quality at relatively efficient file sizes.
- AVIF: Can offer excellent compression, although workflow and compatibility requirements should still be considered.
- JPEG: Still useful for photographic images, especially in existing content and workflows.
- PNG: Useful when transparency or certain lossless graphics are required, but files can become large.
- SVG: Well suited to scalable icons, logos, and some illustrations when implemented securely and appropriately.
For many blog graphics and website images, WebP is a sensible starting point. However, format decisions should account for the actual image, required quality, browser support, and publishing environment.
5. Resize Images Before Uploading
Image dimensions and file size are not the same thing.
A photograph could be 4,000 pixels wide but displayed inside an article at only 700 pixels. Uploading the full-size version can force users to download substantially more image data than they need.
Resize images according to how they will actually be used on the website.
For example, if your blog layout never displays an article graphic wider than 700 pixels, there may be little benefit in uploading a 4,000-pixel-wide source file for that placement unless your responsive or high-density display strategy specifically requires it.
This step should happen before or during publishing rather than after the page becomes slow.
6. Compress Images Without Destroying Quality
Compression reduces image file size, but the objective should not be to hit an arbitrary number for every image.
A simple illustration may compress to a very small file, while a detailed photograph may need more data to remain visually acceptable.
Instead of assuming every image must be below a particular KB limit, find a sensible balance between:
- Visual quality
- Image dimensions
- File format
- File size
- The image’s importance on the page
After compression, inspect the final image. Excessive compression can introduce visible artifacts, blurry text, color banding, or poor-looking product details.
7. Use Responsive Images
Visitors may open the same page on a large desktop display, tablet, or small smartphone. Serving exactly the same oversized image to every device can be inefficient.
Responsive image techniques allow browsers to select a more appropriate version based on factors such as screen size and display requirements.
HTML attributes such as srcset and sizes can help with this process, and modern content management systems often generate multiple image sizes automatically.
The important publishing question is not simply whether several image files exist. Check that the website is actually outputting responsive image markup correctly and that the correct images appear across devices.
8. Specify Image Width and Height
Providing image dimensions helps browsers reserve the appropriate amount of space while a page loads.
Without enough sizing information, surrounding content can shift as an image appears. Unexpected layout movement creates a frustrating experience, particularly when users are trying to read or interact with the page.
When publishing images, make sure the final implementation preserves appropriate width and height information rather than stripping useful attributes without reason.
9. Place Images Near Relevant Content
Context matters.
An image placed next to text discussing the exact subject shown in the image is easier for readers to understand than an isolated image surrounded by unrelated content.
Use relevant:
- Headings
- Body copy
- Captions when useful
- Image filenames
- Alt text
These elements should work together naturally. They should not all repeat exactly the same keyword phrase.
For example, if you show an image demonstrating WebP compression, introduce it within a section explaining WebP or image compression rather than inserting it randomly elsewhere on the page.
10. Use Lazy Loading Carefully
Lazy loading can delay the loading of images until they are needed, which can reduce unnecessary initial page loading.
However, not every image should automatically be treated the same way.
An important image near the top of the page may need to load promptly because it is immediately visible to the user. Carelessly delaying important above-the-fold images can hurt the experience rather than improve it.
Use lazy loading strategically for images farther down the page, and test the actual result rather than assuming that enabling a setting automatically produces the best performance.
11. Make Important Images Discoverable
Search engines need to be able to find the images you want indexed.
Google recommends using standard HTML image elements for images you want its systems to discover. You can review Google’s official image SEO best practices for guidance on image discovery, responsive images, contextual information, and image sitemaps.Avoid implementations that unnecessarily hide important images from crawlers or make their URLs inaccessible.
Google also provides guidance for image sitemaps, which can be useful in helping Google discover images, particularly in situations where discovery may otherwise be difficult.
Large websites should also use image URLs consistently rather than needlessly changing the URL for the same image.
12. Check Image SEO During Publishing QA
Many image problems are implementation mistakes rather than strategy mistakes.
An image may have been optimized correctly before upload but published with the wrong version, incorrect alt text, broken dimensions, or poor mobile rendering.
Add image checks to your normal publishing workflow.
Before a page goes live, verify:
- The image is relevant to the section
- The filename is descriptive
- The correct file was uploaded
- The dimensions are appropriate
- The format is suitable
- The image has been compressed appropriately
- Meaningful images have useful alt text
- The image displays correctly on desktop and mobile
- Text inside graphics remains readable
- No image URL is broken
- Responsive image behavior works as expected
- Important images are crawlable
This is the same reason a complete WordPress publishing checklist matters: optimization is only useful if the final implementation is correct.
Image SEO Example: Before and After Optimization
Consider a business publishing a blog post about improving website page speed.
The original image looks like this:
- Filename:
Screenshot-2026-08-18-142533.png - Dimensions: 2400 × 1600 pixels
- File size: unnecessarily large for its article placement
- Alt text: missing
- Placement: inserted without explanatory text
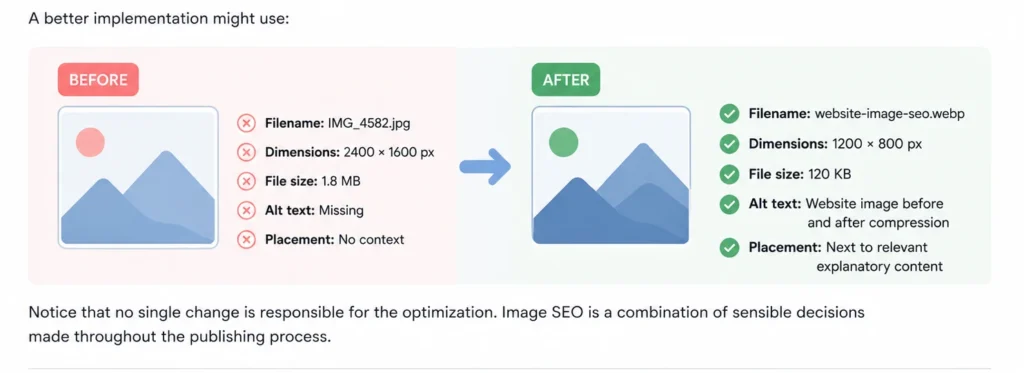
A better implementation might use:
- Filename:
website-image-compression-example.webp - Dimensions: resized for the actual content width
- Format: WebP where appropriate
- Compression: optimized while keeping text and details clear
- Alt text:
Website image before and after compression - Placement: directly beside the section explaining image compression
Notice that no single change is responsible for the optimization. Image SEO is a combination of sensible decisions made throughout the publishing process.
Image Filename, Alt Text, Title, and Caption: What’s the Difference?
These fields are sometimes treated as interchangeable, but they serve different purposes.
| Element | Main Purpose | Example |
|---|---|---|
| Filename | Identifies the image file and provides descriptive context | image-seo-checklist.webp |
| Alt text | Describes meaningful image content or purpose when it cannot be seen | Image SEO checklist showing filename, format, compression, and alt text |
| Image title | Can help organize media in a CMS but should not be treated as a replacement for alt text | Image SEO Checklist |
| Caption | Visible supporting information for readers when a caption is useful | Check filenames, alt text, dimensions, format, and compression before publishing. |
Do not copy the same keyword-filled sentence into all four fields. Use each field for its actual purpose.
Image SEO for WordPress
WordPress makes image publishing convenient, but convenience does not remove the need for optimization.
Before adding an image to a WordPress post or page, check the filename, dimensions, format, and compression. After uploading it, add appropriate alternative text and confirm that WordPress is displaying the intended image size.
WordPress can generate multiple image sizes, which may assist with responsive delivery, but themes, plugins, custom templates, and page builders can affect how those images are ultimately output.
Do not assume an image is optimized simply because it was uploaded through the Media Library. Check the finished page.
If you’re conducting a broader review, include images when performing an on-page SEO audit so image problems are evaluated alongside headings, metadata, internal links, content, and other page elements.
Common Image SEO Mistakes
Stuffing keywords into alt text
Repeating your target keyword in every image description does not make the page more useful. Write alt text for the specific image and its context.
Using the same alt text for every image
Different meaningful images usually communicate different information. Their descriptions should reflect that.
Uploading full-resolution source files unnecessarily
A website normally does not need the same massive image file used for print design or high-resolution photography.
Compressing images too aggressively
A tiny file is not an improvement if text becomes unreadable or the image looks visibly damaged.
Assuming a plugin handles everything
An optimization plugin can automate useful tasks, but it cannot always determine whether an image is relevant, whether its alt text accurately represents the context, or whether the correct visual was selected in the first place.
Ignoring mobile display
Always inspect important pages at different screen sizes. An image that looks excellent on desktop may be cropped, unreadable, or awkwardly sized on a phone.
Optimizing images but ignoring the rest of the page
Image optimization works as part of broader on-page SEO. Titles, headings, content quality, metadata, internal linking, usability, and technical implementation still matter.
Use image optimization alongside a complete on-page SEO process, not as a substitute for it.
Practical Image SEO Checklist
Use this quick checklist whenever you publish a new image:
- Is the image genuinely useful to the page?
- Does the filename clearly describe it?
- Have unnecessary source dimensions been reduced?
- Is the chosen file format appropriate?
- Has the image been compressed without visible quality problems?
- Does a meaningful image have accurate alt text?
- Is the image positioned near relevant content?
- Are width and height handled correctly?
- Does responsive delivery work?
- Is lazy loading being used appropriately?
- Can search engines discover important images?
- Does the image display correctly on desktop and mobile?
When updating existing content, image optimization should also be part of the refresh process. The same pages that need outdated copy, broken links, or metadata improvements may contain oversized or poorly implemented images. See our guide on how to update old blog posts for SEO for a broader content-refresh workflow.
Image SEO Is an Implementation Process
The most effective approach to image SEO is not to add alt text after an article has already been published and consider the job complete.
Think about images throughout the publishing workflow:
Select → resize → choose format → compress → rename → upload → add alt text → position → test → publish.
This approach makes image optimization repeatable and reduces the chance of small publishing mistakes accumulating across dozens or hundreds of pages.
For businesses and agencies managing large volumes of website content, consistency becomes especially important. A clear publishing process helps ensure that filenames, image dimensions, formatting, metadata, internal links, and final-page QA are handled the same way across the site.
NextWebOps provides hands-on content implementation and website publishing support, including image optimization, content formatting, metadata, internal linking, and publishing QA. If your team has content ready but needs reliable implementation, contact NextWebOps to discuss your publishing workflow.
Frequently Asked Questions About Image SEO
What is image SEO?
Image SEO is the process of optimizing website images so they are useful to visitors, accessible where appropriate, efficiently delivered, and easier for search engines to discover and understand. It can include filenames, alt text, formats, dimensions, compression, responsive delivery, surrounding content, and crawlability.
Does alt text help SEO?
Alt text can help search engines understand meaningful images, but its primary purpose is to provide an alternative description when an image cannot be seen. Write accurate, useful descriptions rather than stuffing keywords into alt attributes.
What is the best image format for SEO?
There is no universal best format. WebP is a strong choice for many website images because it can deliver good quality with efficient file sizes. AVIF, JPEG, PNG, and SVG also have appropriate use cases. Choose based on the type of image, required quality, compatibility, and performance needs.
Does the image filename matter for SEO?
A descriptive filename gives search engines and website managers additional context about an image. Use short, readable filenames that describe the image, such as image-seo-checklist.webp, rather than generic names such as IMG_4582.jpg.
How large should website images be?
There is no single ideal file size for every website image. The appropriate size depends on the image’s dimensions, complexity, format, required visual quality, and placement. Resize images for their intended use and compress them enough to reduce unnecessary data without making them look poor.
Can images rank in Google Images?
Yes. Google can discover and index eligible website images and may show them in Google Images and other search experiences. Relevant content, accessible image URLs, standard HTML image implementation, descriptive information, and overall page quality can all contribute to how Google understands an image.
Should every image have alt text?
No. Meaningful images should generally have alternative text that communicates their content or purpose. Purely decorative images may use an empty alt attribute when appropriate so assistive technologies can ignore them. Alt text should be based on the image’s role on the page rather than added simply for SEO.
Leave a Reply